
| » Forum Index » Problems and solutions » Topic: erasing sky |
|
Posted on 20/12/05 11:45:54 PM |
|
timpl
* Posts: 12 Reply |
erasing sky
1) Best PS book I have ever seen (and the first I ever purchased...none of the others seemed to be worth buying) 2) I am asking for a good way to approach this. I have a picture that I want to add a sunset sky in. If I add the sky to this picture I need to erase the gray sky from between the tree branches. I have tried replacing background, magic wand, pen tool seems to be out of the question. Background eraser erases, or lightens too many brances. What would be the best way to approach this (besides erasing between every branch)? Many thanks  |
Posted on 21/12/05 09:11:01 AM |
|
Steve Caplin
Administrator Posts: 7157 Reply |
Re: erasing sky
The Background Eraser is certainly the way to go on this one. If you haven't been successful with it, maybe you're using the wrong settings. Two settings are critical: you have to set the tool to Sample Once (to avoid sampling the branches themselves) and Discontiguous (so you can get in between those branches). Here are the settings I used: 
If you're being left with a light fringe, it could be because you're using too low a tolerance. I used 60% in this example, which seemed to suit the balance between light and dark in the image: 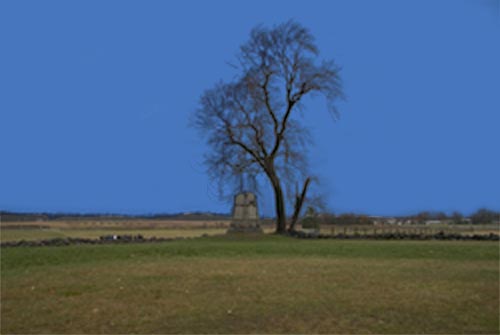
Hope this helps - and welcome to the forum! |
Posted on 21/12/05 09:59:01 AM |
|
maiden
Golden Gif Gagster Posts: 471 Reply |
Re: erasing sky

Okay this was a little tricky to do but with some tweaking it came together using a multi-layered approach. Firstly I created a selection of the sky using the 'Color Range...' tool in the 'Select' menu with Fuzziness set to about 24% adding in as much of the sky as possible and created a mask of the selection which I applied to the Sunset layer which was pasted above the tree layer. I then made a duplicate of the tree layer and pasted it above the sunset layer and set the Blending Mode to 'Hard Light'. I added a mask of which I brushed out the grass, stone plith, up to the horizon with a brush set to black. Then I made a duplicate of the sunset layer and pasted it above the hard light layer as a 'Clipping Mask' and set it's Blending Mode to 'Color' I then clicked on the hard light layer and used a Brightness & Contrast adjustment to increase the brightness and lower the contrast which can be judged by eye. And there it is, hope this answers your question. I can send you the .psd if that helps you understand what I did any better. _________________ mad as a badger and twice as furry |
Posted on 21/12/05 8:15:06 PM |
|
rufus
Destructive Demon Posts: 243 Reply  |
Re: erasing sky
When I saw this problem I thought it was nigh on impossible to get a satisfactory result due to the size/resolution of the image. Both Steve and Maiden have clearly shown how wrong I was! But Steve, I have tried your technique and my effert doesn't look anything like as good. Will you give more detail on how you achieved it. Thanks |
Posted on 22/12/05 00:11:21 AM |
|
timpl
* Posts: 12 Reply |
Re: erasing sky
Steve & Maiden I thank both of you for your information. I now definitely know there are good ways to do this than by erasing between all of the branches. Steve I am with Rufus, I went back and tried your settings and again, I lost a lot of branches. Your tree appears to have them all. Is there something else I should doing/not doing? Possibly, did you sample and erase only between the brances as opposed to running the backgroud eraser through the whole tree? Maiden; I have not tried your technique, yet, I will start after this reply. Your tree also looks terrific. If you don't mind, yes I would love to see the PSD file. My email is timpl@comcast.net. Just fyi, I liked your sky, I noticed it had a nice perspective, which I originally lacked in my working version. This morning (after reading more of the book, again) I figured out how to do put the perspective in. |
Posted on 22/12/05 09:51:18 AM |
|
Steve Caplin
Administrator Posts: 7157 Reply |
Re: erasing sky
It all depends on where you start to click with the Background Eraser tool. It can take a little trial and error to find the point that has exactly the right shade to be able to erase the sky, but not the tree. Let's say we take these three regions of the sky as our initial click points: 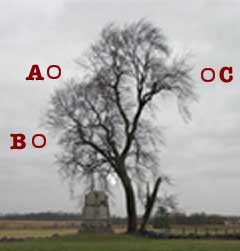
Clicking on A first produces a result where not enough of the sky is erased, as the click point is too bright. Chunks of sky remain where they should be erased: 
Clicking on B has the opposite effect: this area of sky is just too dark, and too much of the fine branch tones are removed in the process: 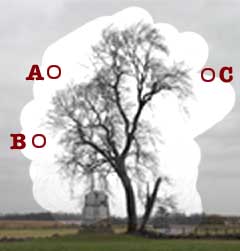
Starting at point C produces a good balance between the two, removing most of the sky without damaging the branches: 
Of course, the Background Eraser won't do the job in its entirety: for areas of blank sky, it's a lot easier to select it with the Lasso or Marquee tools, and simply delete. Each of the above examples was done with a single continuous stroke of the eraser; it's often necessary to go back afterwards and sample some extraneous, remaining sky in order to delete it. Does this help? |
Posted on 22/12/05 10:20:21 AM |
|
junipaire
* Posts: 42 Reply |
Re: erasing sky
Thanks Steve for bringing my attention to the background eraser, amazingly I've just always used the normal eraser for everything just tried the background eraser with set to find edges and its awesome, I'm an idiot I never knew it was there. |
Posted on 22/12/05 2:35:40 PM |
|
Steve Caplin
Administrator Posts: 7157 Reply |
Re: erasing sky
It's in the book, junipaire! |
Posted on 24/12/05 3:54:13 PM |
|
timpl
* Posts: 12 Reply |
Re: erasing sky
Steve; Thanks for the extra information. Very helpful. I just need a little bit more patience and a lot better eye. timpl  |
Posted on 25/12/05 8:56:40 PM |
|
timpl
* Posts: 12 Reply |
Re: erasing sky
Maiden; After trying your method and looking at your PSD file, I now I know why your sky perspective was so good. You achieved the result in a completly different way. Very nice. I see what "Hard light" can do now. Thanks timpl |
Posted on 30/12/05 10:44:04 PM |
|
sekong
* Posts: 5 Reply |
Re: erasing sky
My apologies for going off track with this question though based off the same image. What is the preferred way to remove the tree from the image? I mean, how would one go about selecting the tree (what would be the best tool) and deleting it from the image? Thanks for the help or idea(s). |
Posted on 31/12/05 00:00:46 AM |
|
trinityofone
Guest Reply |
Re: erasing sky
Do you want to remove the tree for use elsewhere or take it out of the scene? For the latter, you would use the clone tools and patch in the sky and grass. To remove it for later use, simply isolate it using the previous technique and then erase the remainder of the image. You can then save it as a new file. _________________ It must be Thursday, I never could get the hang of Thursdays |
Posted on 31/12/05 04:00:54 AM |
|
paul 2005
Guest Reply |
Re: erasing sky
When I dragged the original image from this thread into my photoshop window I noticed a small "target" and a number 1 next to it. It's just to the top right of the tree. If I save the original image instead and loaded it into photoshop I don't get it. Any ideas what it is? 
|
Posted on 31/12/05 09:48:17 AM |
|
maiden
Golden Gif Gagster Posts: 471 Reply |
Re: erasing sky
It's a Color Sampler point Paul. If you go to the Eyedropper Tool icon on your Tool Bar Menu then right mouse click you can select the Color Sampler Tool and place sample points on your image to gauge the colour values at those points. If you look at the Options bar at the top for the Color Sampler Tool there is a button marked 'Clear' which will delete all those points or you can hover the mouse over the point and Right Click then select delete. _________________ mad as a badger and twice as furry |
Posted on 31/12/05 1:06:15 PM |
|
Lexus
Persistent Pixellator Posts: 623 Reply  |
Re: erasing sky
yer, but how the hell did it get there in the first place? _________________ 3 Radio Visit http://www.3-radio.co.uk and listen! You will love it! |
Posted on 31/12/05 1:19:10 PM |
|
maiden
Golden Gif Gagster Posts: 471 Reply |
Re: erasing sky
If Paul saved the image within Photoshop and didn't erase any sampler point(s) used (accidentally or otherwise) then the sampler point(s) will have been saved with it and therefore when reopened it will open complete with sampler points in their correct position(s) - this works with .jpg .psd and .tiff files too. _________________ mad as a badger and twice as furry |
Posted on 31/12/05 7:24:23 PM |
|
paul 2005
Guest Reply |
Re: erasing sky
Thanks Maiden. I didn't realise that sort of information could be stored in a jpg. |
Posted on 02/01/06 4:42:32 PM |
|
Lexus
Persistent Pixellator Posts: 623 Reply |
Re: erasing sky
Yer, I thought *.JPG was just any old file type that saved nothing but the picture on 1 layer, if only it could store things on layers, instead of on giant sized *.PSD files _________________ 3 Radio Visit http://www.3-radio.co.uk and listen! You will love it! |
Posted on 02/01/06 8:11:30 PM |
|
timpl
* Posts: 12 Reply |
Re: erasing sky
Maiden; Thanks for the reply to Paul, I knew I put that there, just did not know how to erase it, even though I coul "hide" it. |
Posted on 04/01/06 01:05:04 AM |
|
sekong
* Posts: 5 Reply |
Re: erasing sky
Thanks for the quick response. I want to take the tree out of the scene. I will try your suggested method. |