
| » Forum Index » Reader's Tutorials » Topic: Extreme Selecting |
|
Posted on 18/01/07 03:47:13 AM |
|
tank172
ThreeDee Thriller Posts: 692 Reply |
Extreme Selecting
My Turn!! 
Yes, I love the Pen Tool. I feel it a necessary tool that everyone should master in Photoshop, especially when selecting. But, I've come to grips with the fact that in the Newspaper Industry, they don't want you spending ages drawing around detailed pictures to make selections. The Pen Tool is wonderful for selecting, but it also can be a time-consuming bear. So, I've come up with a solution to meet time-constraints & deadlines quicker with Extreme Selecting...and I'd like to share the knowledge with you. In this tutorial, I'll demonstrate how to knock out a background quickly by making temporary adjustment layers. Our sole objective with these adjustment layers will be to make the most contrast possible between our subject and what we want to get rid of. These temporary layers will be hidden/deleted later as they will not be part of the final image. 1) Duplicate the image layer (The original always comes in as a handy backup!) 
2) Make a curves adjustment layer & fiddle/experiment with the curve until you get decent contrast between the subject & background. (In this case, there was considerable contrast with the gift wrapping.) 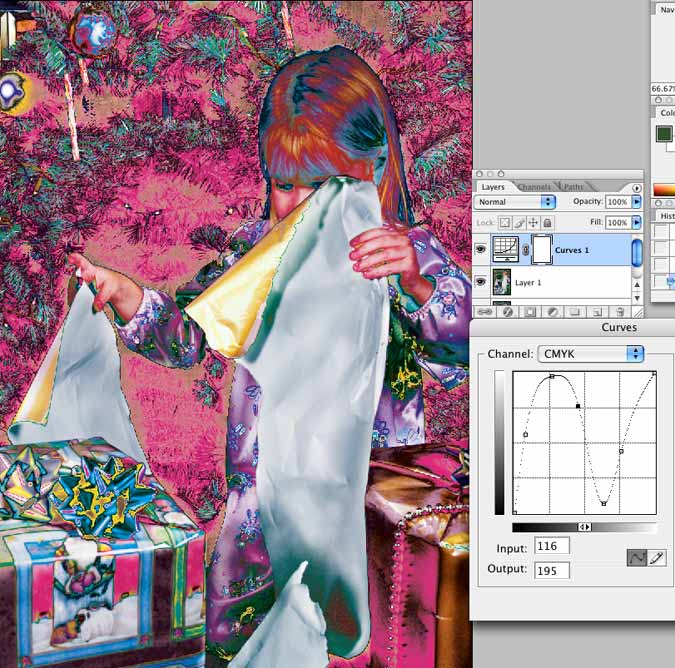
3) Make a brightness/contrast adjustment layer & fiddle with that until there's plenty of contrast at the cut line. 
4) Start selecting with the Magic Wand tool by shift-clicking the subject area. Be sure the tolerance is set to around 50. (Also, have your IMAGE selected in the layers pallet, not the brightness/contrast adjustment layer as shown in the picture...Oopsie!) 
Now, with your new selection you need to soften the edges. I like to do this with the feather tool. Go to Selection > Feather and choose a radius of about 3. 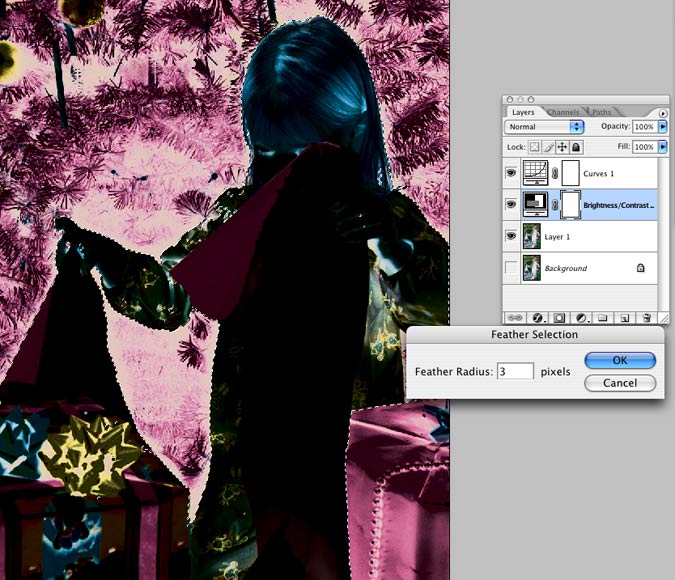
5) Next, make a layer mask of the selected area. (CTRL+J for Windows, CMD+J for Mac) 
6) Turn off the adjustment layers to see the image. 
7) You will notice some areas that have been picked up with the Magic Wand. Since you used a Layer Mask, it's easy to fix this. Simply pick a brush & paint on the mask with the foreground color set to Black (to hide) or White (to reveal). 
You may notice that I used the words "fiddle" and "expirement". So be sure to use anything on the adjustment layers to acheive the most contrast. You could use Levels, Curves, Hue/Saturation, anything! You can also make these adjustments directly on the copy layer of your image and once having made the selection, hide the altered image layer and select the background image, press delete & you'll have the changes. This tutorial may take some getting used to as far as the method itself...but if you try it a few times with different images, you'll get quicker & more efficient at selecting what type of adjustment will acheive the best results. Also, you'll discover some pretty cool & interesting effects in the process. HAVE FUN!!! 
Chris |
Posted on 18/01/07 04:30:04 AM |
|
tank172
ThreeDee Thriller Posts: 692 Reply |
Re: Extreme Selecting
This is also a beautiful technique for isolating & selecting hair |
Posted on 18/01/07 1:34:46 PM |
|
BigVern
Q Quipper Posts: 674 Reply |
Re: Extreme Selecting
Thanks Chris, This looks really useful. I also like the power of the pen tool but do agree that it can take a long time to get the selection right, therefore your quick and dirty method looks like a winner. _________________ There are holes in the sky where the rain gets in. The holes are very small that's why rain is thin. |
Posted on 18/01/07 5:34:55 PM |
|
tank172
ThreeDee Thriller Posts: 692 Reply |
Re: Extreme Selecting
Thank You, BigVern. I'm glad you enjoyed the tutorial. I really could have done better on it, though.  After a few more tweaks, the contrast can become so much that you click the Magic Wand tool only once & you'll have your selection. Also, I should have contracted the final selection by 1 pixel first, then used the feather at 2 pixels. That way, there will be a tighter selection just before creating the layer mask. After a few more tweaks, the contrast can become so much that you click the Magic Wand tool only once & you'll have your selection. Also, I should have contracted the final selection by 1 pixel first, then used the feather at 2 pixels. That way, there will be a tighter selection just before creating the layer mask.
I should have finished the tutorial by placing a different background, as well as painting out the part of the tree under her arm. But it was getting very late, and the sheep were passing me by! 
The technique is quick, and when done correctly...the final cut-out looks very clean. I discovered this by messing around with Alpha Channels with some of my 3D Renderings in Photoshop. With these types of Alpha Channels, the foreground is flat white & background is flat black. (or visa-versa). This makes selections extremely easy. So, I started figuring out a 'Jerry-Rig' for doing the same thing with photographs. 
Chris |