
| » Forum Index » Problems and solutions » Topic: color correction |
|
Posted on 16/05/08 4:17:49 PM |
|
cy98
** Posts: 115 Reply |
color correction
Enclosed is a shot with model in white dress and light gray background. The skin is way too orange. I can get reasonable results with Color Balance tool by decreasing Cyan and lightening image. However, I would like to get a handle on how to get same results with the "granddaddy" of color correction tools in Curves. Steve's book has enough on it to get the basic concept. Have tried adjusting curves on RGB and on Red or Green channels, but nothing seems to work like the simple Color Balance tool. Can't seem to get the red to go away and still leave the background white. Can anyone steer me in the right direction or to a good, preferably free, guide on Curves? Thanks 
|
Posted on 16/05/08 5:50:00 PM |
|
Luis
Six-String Synthesist Posts: 236 Reply  |
Re: color correction
here is a quick correction using curves. Is this what you trying to get? 
Luis |
Posted on 16/05/08 6:18:04 PM |
|
cy98
** Posts: 115 Reply |
Re: color correction
Well as a matter of fact yes. Thanks for including the screen shot of the channels, as it gives me something to work with for learning. Is there a method to your madness, or is it strictly random fiddling? For example, I have the histogram showing on Curves, does that give you any clues as to how to shape the curves when viewing each channel? Do you use the eyedroppers for anything? Thanks for the help. |
Posted on 16/05/08 6:27:32 PM |
|
GKB
Magical Montagist Posts: 4125 Reply |
Re: color correction
Hi Cy, It's not easy to see exactly what is going on with such a lo-res image but here goes. There may be other tweaks that might be needed that would show themselves on a higher-res image but this gives a basic idea. One of the most powerful colour correction methods uses Lab mode. Image>Mode>Lab Use a Curves adjustment layer, select the a Channel and take it to roughly the point shown on the screen grab. You must convert back to RGB or CMYK when you have finished but there is no degradation of the image when converting. The screen shot shows the image partially masked to show the original on the right side. Lab is a totally different world from either RGB or CMYK and opens up a whole host of possibilities. It is too deep to go into here. The book 'Photoshop Lab Color' (sic) by Dan Margullis explains everything you ever needed to know about Lab. Unfortunately the deciphering of ancient Greek Heiroglyphics was a little easier than getting your head around some of the concepts of Lab. 
|
Posted on 16/05/08 6:57:18 PM |
|
cy98
** Posts: 115 Reply |
Re: color correction
Thanks for the reply, never knew about Lab color before. Followed your screen shot and got good results. Will have to play around with it and see if there is a rhyme or reason to adjustments. See that a channel affects green red. Do you use the histogram to get any clues as to how to shape the curve? Will play with it a little more, but on the surface seems easier than using Curves in RGB mode as there are fewer channels, but maybe that is more limiting. |
Posted on 16/05/08 7:21:53 PM |
|
Luis
Six-String Synthesist Posts: 236 Reply |
Re: color correction
Cy, When it comes to photo correction, it is mostly random fiddling. I don't do that much photo retouching and I don't use Curves that much. I'm not sure what the eye droppers really do. I still have much to learn when it comes to using Curves. I just tried using Lab Color, which I never looked at before and it gave me something new to work with. Luis |
Posted on 16/05/08 8:37:14 PM |
|
dave.cox
Marquee Master Posts: 518 Reply  |
Re: color correction
Hello Cy, Yes there is a much better way than just fiddling to determine what adjustments to make for a color adjustment. I nearly always take a look at the histogram, to see where the color information is missing. In the case of this photo, there is such a sharp contrast between the subject and the background, it helps to isolate just the subject, which you can do simply by making a selection. 
Looking at the histogram, you can see where there is no information. By applying a levels adjustment layer, and pulling the slider for each color the the edge of where the histograms start, you can usually get a very good color adjustment. Sometimes that will just be a good starting point, but other times it will be all that you need. |
Posted on 16/05/08 8:45:13 PM |
|
dave.cox
Marquee Master Posts: 518 Reply |
Re: color correction
And here you can see the adjustements  |
Posted on 18/05/08 03:24:02 AM |
|
cy98
** Posts: 115 Reply |
Re: color correction
Thanks Dave. The more I learn about photoshop the more I realize how little I know. |
Posted on 18/05/08 09:02:27 AM |
|
Nick Curtain
Model Master Posts: 1791 Reply |
Re: color correction
Hi Cy Dave's suggestion of using channels is excellent. There are a couple of other ways you may wish to try, but there is no alternative for experimentation. Firstly, in Curves, or Levels the eyedroppers will force the colour. If you select the white dropper and click on the background it will force that shade to pure white, 255,255,255. Go to Window / Info and hover the cursor over the background and you will see this. Anything that does not have these numbers is not pure white. The danger is that it will force similar shades too, so it is important to follow Dave's suggestion and isolate the model first. The grey dropper is the primary colour correction tool. You will see photographers shoot their subject holding a grey card, so in post processing using Curves they can use the grey dropper to click on the shot and the grey will turn grey. This in turn neutralises any colour cast. Save the Curves adjustment so you can load it when working on other images takin during the same session. All studio lights will give off a different colour tempretaure and the age of the flash bulb can have an affect too. Another important aspect is to ensure the background is lit to between 1 and 2 stops more than the subject, so it becomes pure white. Once you have isolated the background you can CTRL click the Curves mask to load the selection again and invert it - CTRL SHIFT I. This will then select the model and the first step is to make a basic levels adjustment to suit your objective. If the dress is pure white you can try using the white dropper, but this tends to be hit and miss. If you double click the grey dropper, the colour picker will appear and if you click on the dress it will show you how far away from grey you are. Drag the circle in the colour picker directly left into the grey zone of the colour and click back into the image on exactly the same spot from where you took the sample. It does not always work where there is a hint of another colour in the material. Adjusting the opactity of the Curves layer will enable you to tailor the effect. Also, try duplicating the background (having levelled first) and go to Blur / Average Blur. This will find the average colour of the image. Set the blend mode to colour and invert the layer by pressing CTRL I. Your image above will turn to the opposite colour, i.e. bluish. Adjust the opacity of the blur layer to around 25% and it will neutralise the colour cast. Again, not always successful and much depends on the image, but worth a try. Nick. 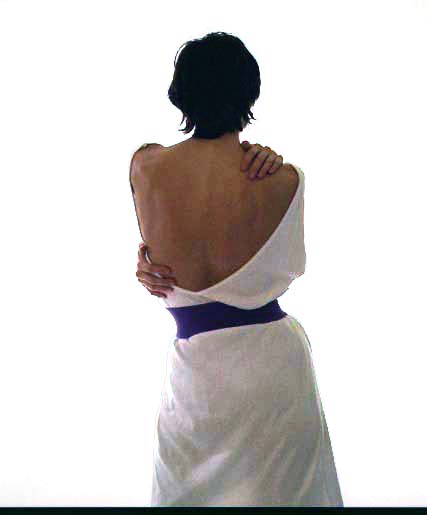
|
Posted on 19/05/08 02:27:11 AM |
|
cy98
** Posts: 115 Reply |
Re: color correction
Thanks Nick, that is a big help in use of the eyedroppers. |
Posted on 19/05/08 1:48:49 PM |
|
dave.cox
Marquee Master Posts: 518 Reply |
Re: color correction
Using the eyedroppers is a good method, that works well in many cases. In fact, it is very close to the method that I showed, but is automatic, and the adjustement are made in curves instead of levels. After you make the adjustement, you can open the curves layer and see the adjustements that were made, and modify them if you want. When using the eyedroppers, you should look for areas in the picture that you know should be white, for the white dropper, black, for the black dropper, and median gray for the gray dropper. That is what you are doing with the droppers, is defining where these point should be. Photoshop then uses this information to make curves to adjust the photo based on these points. |
Posted on 19/05/08 11:31:46 PM |
|
cy98
** Posts: 115 Reply |
Re: color correction
Nick, or anyone else When I isolate the model how do I switch between selection and the rest of the shot? I have tried loading the selection and selecting Inverse, but that does not seem to do it. After selecting the model and using the white eyedropper on the dress, I want to use the white eyedropper on the background. Can't seem to affect anything but model. Don't see any options in Curves to Invert. I prefer keyboard commands so I know what I am doing. |
Posted on 20/05/08 07:28:03 AM |
|
Steve Caplin
Administrator Posts: 7129 Reply |
Re: color correction
Once you've made your selection, that's it - if you're inside a dialog, whether it's Curves or Levels, that's the selection you're working with. If you want to inverse the selection, you have to dismiss the current adjustment, use Ctrl Shift I to inverse, then open the adjustment again. |
Posted on 20/05/08 2:40:26 PM |
|
cy98
** Posts: 115 Reply |
Re: color correction
I am missing something here. I isolate the model, and make that a new layer (layer 1). In curves I can vary the color balance of just the model as it should work. I exit curves and if I click Ctrl Shift I it does nothing (using PC). Then I click Select>Load Selection. When I get Load Selection window I choose Layer 1 transparency and click Invert. I then make that a new layer, as layer 2. When I select layer 2 and use curves, or Hue/saturation, it does nothing. If I select layer 1 everything works as it should. What am I doing wrong? |
Posted on 20/05/08 9:56:58 PM |
|
cy98
** Posts: 115 Reply |
Re: color correction
Ok, think I have it figured out. When I make the selection I should not make it a layer. Then I can invert that selection if I want to affect just the background. Not sure why it does not work if it is layer, and correct layer is selected. |
Posted on 20/05/08 9:57:06 PM |
|
Steve Caplin
Administrator Posts: 7129 Reply |
Re: color correction
OK, this is fairly straightforward. Once you've made the isolated model into a new layer, that's the layer that will be affected by any adjustment you apply to it. Curves, Levels, Hue/Saturation, makes no difference: they only apply to the current layer. Inversing the selection makes no difference, of course, as the area outside the selection isn't on this layer. If you want to make an adjustment that affects all layers, use an Adjustment Layer instead - these are chosen from the pop-up menu at the bottom of the Layers palette. |
Posted on 21/05/08 05:59:13 AM |
|
Nick Curtain
Model Master Posts: 1791 Reply |
Re: color correction
Apologies, I should have made myself clearer and thanks Steve. Assume we just have a background layer, make a selection of the area you wish to affect using whatever method suits. This will produce the marching ants. When you click on the adjustment layer Icon a mask will appear automatically. So, if you click on the white area around the girl, that will be the area which is selected for adjustment and she will appear as solid black on the mask, i.e. she's 'hidden', much in the same way as a normal mask would work. You then make the adjustment, i.e. brighten the background area using levels or curves and click ok. If you have made an intricate outline of the girl using the pen or another time consuming method, it would be daunting to have to go through the whole process again to select the girl. This is where the mask from the first adjustment layer comes into play. Click on the agjustment layer to ensure it is active and CTRL click on the mask thumbnail and this will reload the original selection. Of course, you are only selecting what you did before. CTRL Shift I will inverse the selection and you can now select another adjustment layer to work on the model. The key here is to ensure you have the correct amount of feathering, otherwise there will be some seriously sharp transition when you start pushing the curves etc. Feathering can be done when the selection is made originally, but a better method is to blur the mask slightly and go to Levels via the Image / Adjustments route and move the middle (gamma) slider. You will see that the mask will losen and tighten around the figure as you move the slider. Nick |
Posted on 21/05/08 2:22:08 PM |
|
dave.cox
Marquee Master Posts: 518 Reply |
Re: color correction
There is enough contrast with this picture that you shouldn't need to work very hard to make a selection. It only took me a couple of seconds to make the selection as shown in my example above. For this particular photo, I used Select>Color Range to make my selection. With the Color Range tool, click on the background. Slide the fuzziness slider until you get a nice black and white contrast in the sample box. About 105 will work nicely. You will now have the background selected. Ctrl+Shift will invert the selection to the girl and the black bar at the bottom. Switch to the square marquee tool, and alt+click+mouse drag to create a box around the bottom black box. This will deselect the black box. |
Posted on 21/05/08 3:06:04 PM |
|
cy98
** Posts: 115 Reply |
Re: color correction
Thanks Nick and Dave for the fine details on how to execute those operations. This will help myself and others that have less than full mastery of PhotoShop to do the operation with a minimum of confusion. Of course doing it and being able to repeat it without notes is a different issue. This whole exchange tips from everyone has been a great help. |