| » Forum Index » Problems and solutions » Topic: to collage it bigger |
|
Posted on 10/02/12 05:40:34 AM |
|
panacea_thailand
* Posts: 14 Reply |
to collage it bigger
I have a project to let an ordinary picture [with high res I believe] printed out as bigger than a poster size. Let say 1 metre x 1.5 metre. The problem is I cannot afford to hire the professional shop printing it out. All I can do is only print the output out as some papers of A4 size then I will collage them together to the wall later. How can I do such this thing with photoshop, to seperate an ordinary picture like we put grid on it, and seamlessly tile them up later? Thank you for your help guys. Best regards, P. |
Posted on 11/02/12 7:52:33 PM |
|
Nick Curtain
Model Master Posts: 1768 Reply |
Re: to collage it bigger
This can be done, but it will take some effort, a pair of scissors, lots of paper and I'm not sure you'll be happy with the end result. My advice would be to search the web for a print shop, which can print relatively cheaply. There are a couple here in the UK, but you may not be so fortunate in Thailand? The limitation lies in the size of the paper your printer is able to accommodate. Most domestic printers cater for A4 (297 X 210mm), so you will need quite a few sheets and lots of ink to produce an image the size you want. The task will be made considerably easier with an A3 machine and paper. Both A3 and A4 have an aspect ratio of approx 3:2, so you'll have to size each section of your image to produce the desired result. Lets's base this on an A4 printer and paper. So an A4 will give you approx 18cm x 27cm per sheet, allowing for non edge to edge printing, or 18cm x 18cm, if you choose to go for a square crop, which may prove simpler in the calculation. The image I've attached is 8in X 12in @300ppi and the grid has been set to gridlines every 1 inch with 1 subdivision, via Edit / Preferences Grids, Grids and slices. You will need to resize the image in chunks, but remember that while PS uses an intelligent interpolation method, you will lose quality if you try and push the file too hard. So for the file attached you could try setting the crop tool to 18 x 18 cm @ 300ppi and then run the crop over 4 squares. Once you have cropped the file, go to file / save as and then save as a high quality JPEG. Once done, undo the crop and move onto the next section. In this example you will produce an image 4 sections x 6 sections @ 18cm = 72cm x 108cm. Clearly there are no hard and fast rules with this and the way you approach the task will depend on the size of paper you're using and the size and quality of the image. When you come to print and put the jigsaw together, name the files in a logical way. In the file / print dialogue, set up your printer to the correct paper size and be sure you do NOT scale to fit media. This means that when you print the image will be the exact size. I hope I've explained this ok and that you have success with the result. As said, it's a question of grabbing a calculator and planning the job carefully. Nick 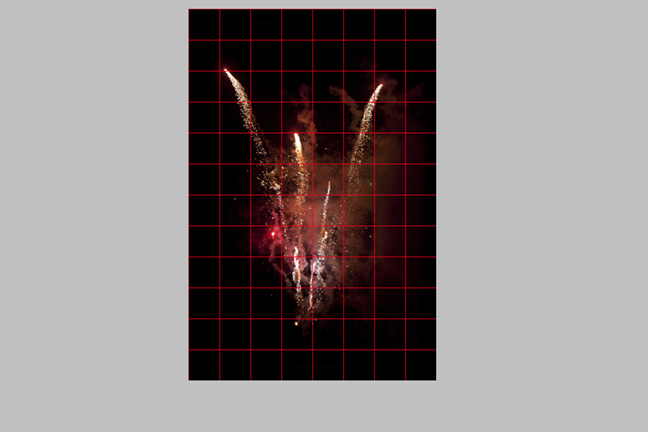 |
Posted on 12/02/12 03:08:14 AM |
|
tank172
ThreeDee Thriller Posts: 692 Reply |
Re: to collage it bigger
Hi Panacea, One problem you might encounter by tiling your print on multiple sheets, would be image shifts during printing. Your printer might not print each image in the exact same orientation for every page, so you might end up with gaps if you didn't plan for it. Maybe add a little bleed (overlapping image on the edges of each page)....and trim the print to match the edges more accurately. The best way for me to demonstrate this was in Illustrator (you could download the trial version from Adobe) Also, this method is completely automated once you setup the initial document. Really only takes a minute or two. I created a document with 8"x11" artboards and tiled it up with 0.1875" bleed. All you have to do is place the image in the document (File -->Place), Resize the image to fit in all of the boxes you see. Then export to .PDF (File --> Save As --> choose PDF file format and MAKE SURE the box "Use Artboards" is checked.) --> Click OK. In the next box will be the PDF settings. Generally, you could choose the "High Quality" preset, and then under "Marks and Bleeds", check "Trim Marks" and also check "Use Document Bleed" settings. It should pickup the bleed settings. Also, under "Output", choose "No Conversion" for color conversions. Then create your PDF. The PDF file will have the tiles you want to print, along with handy crop marks so you can trim down the image more accurately on your A4 paper for lining up. Also, be sure your printer doesn't "Scale image to fit" in the settings. It can be done in Photoshop and allow bleeds on the pages, but I can't think of an automated way to do it easily.... perhaps some use of Actions on a document.... 
Hope this helps makes things easier and more automated when you go stitching the prints together. The result will be seamless after you trim down the prints. 
You can download the Illustrator CS5 file I created for you here: http://www.aerialhighlights.com/_forum/bleeds.ai Here is an example .PDF of what I'm talking about... http://www.aerialhighlights.com/_forum/bleeds.pdf All the Best, Chris |
Posted on 12/02/12 03:13:00 AM |
|
tank172
ThreeDee Thriller Posts: 692 Reply |
Re: to collage it bigger
My math may be a little off in the Illustrator document.... 8" height with .1875 bleed will be too big to fit on A4. But the concept is there for you
Also, the Illustrator file could act as a template... and just replace the image when you want to print the next collage.
|
Posted on 12/02/12 04:39:26 AM |
|
panacea_thailand
* Posts: 14 Reply |
Re: to collage it bigger
Dear all & Dear Chris & Dear Nick: (alphabetically) I'm overwhelmed and do appreciate all instructions. They are so insightful. They are such warm welcomes. I will follow them as much as possible. They help me a lot. Thank you very very much! Faithfully yours, P. |