
| » Forum Index » Readers' gallery » Topic: My first time here. |
|
Posted on 14/06/09 9:23:22 PM |
|
Hubert
* Posts: 5 Reply |
My first time here.
Hello everyone, Although I am not a newby to photography or photoshop, I used the software mostly to simple corrections of pictures, nothing more serious than saturation or basic levels. So here I have to confess I feel like complete beginner. My goal with this montage was to make it look as real as possible. Would you say it doesn't looks fake, or if it does to you, and what could be done better next time? At the beginning of the learning process I feel I am really missing some constructive critisism. After some time spending in front of the screen with one picture I have to love that one, if you got the point... 
Greetings from Poland to everyone, Steve especially, Hubert 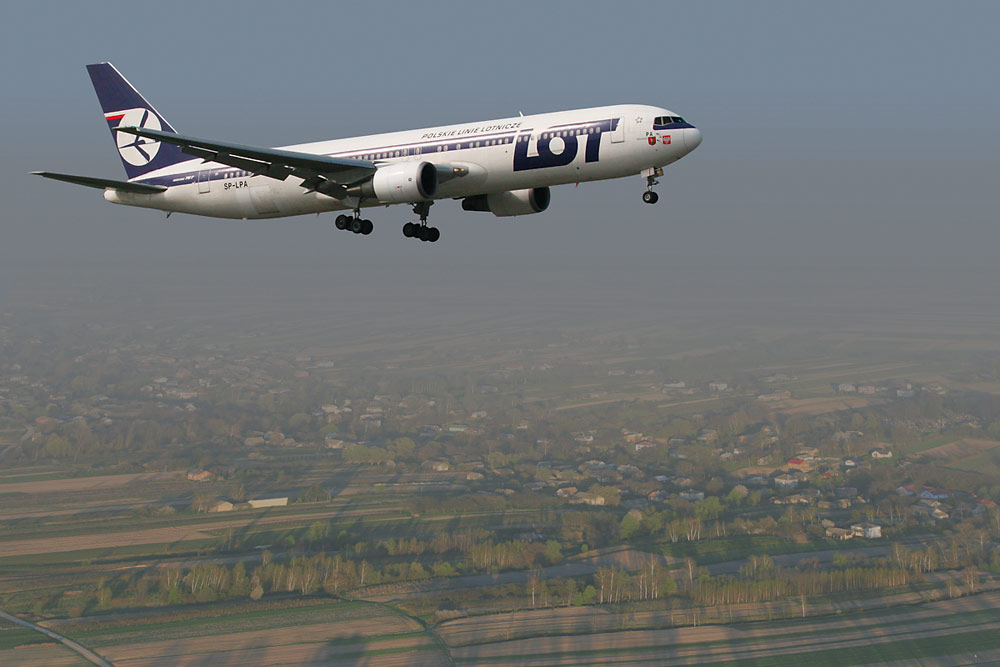
|
Posted on 15/06/09 10:42:34 AM |
|
Nick Curtain
Model Master Posts: 1799 Reply |
Re: My first time here.
Hi Hubert and a warm welcome. Great cut out job on the plane. The giveaway for me is lighting and this is key in any montage. The trees are casting very long shadows on the ground. so the background shot is taken very early in the morning, or late in the evening. On the plane, the shadows from the wings on the fusilage and left engine suggest the sun is coming from above. In this setting with the sun very low, the lighting on the plane would be different, with the wheels and lower portion of the fusilage being lit with a warmer light. Nick |
Posted on 16/06/09 1:53:14 PM |
|
Steve Caplin
Administrator Posts: 7150 Reply |
Re: My first time here.
Welcome to the forum, Hubert. I agree with Nick's comments. I'd also like to point out that while the plane is crisp and well contrasted, the ground looks as if it has been photographed on a foggy day. Now this may well be the way it would really look, but the difference in tone makes the two elements seem to fight each other. Try increasing the contrast on the background, and see if that brings it more in line with the plane. |
Posted on 16/06/09 11:32:23 PM |
|
Hubert
* Posts: 5 Reply |
Re: My first time here.
Thank you very much for the comments. This is what the picture shows after some changes. Does it look more convincing? I don't have any idea what to do with shadows under the wings - every attempt looked very artificial... Anyhow, what do you think about this version? Is it good direction? Rgrds, Hubert 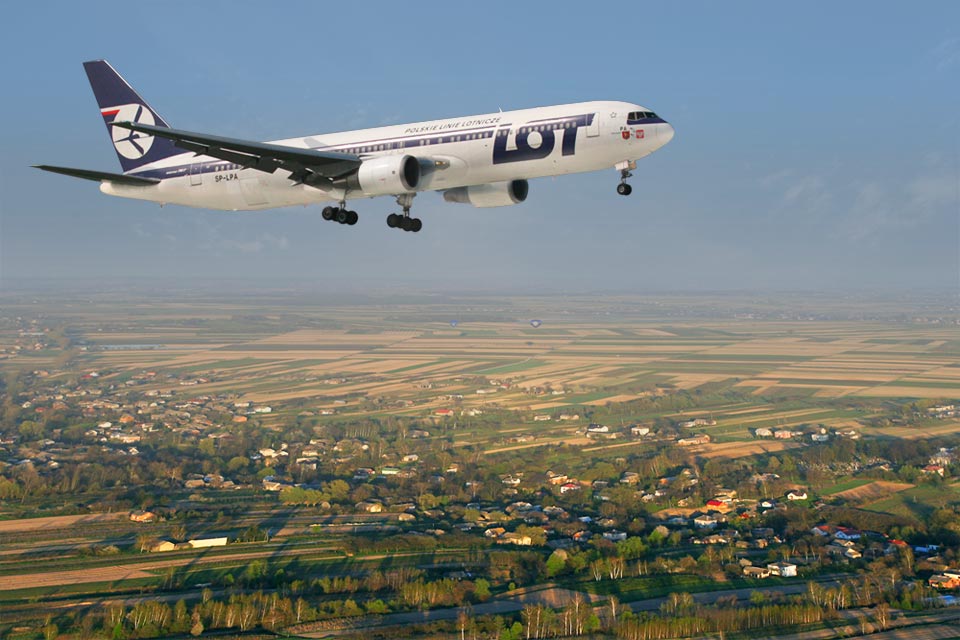 |
Posted on 17/06/09 08:27:20 AM |
|
Steve Caplin
Administrator Posts: 7150 Reply |
Re: My first time here.
Yes - that looks a lot better. Very good work on the shadows on the underside of the plane. The problem is that all the usual tricks - adding ground shadows, placing background objects in front of the added element, and so on - can't work with this kind of montage. And since few of us have been close enough to another plane in flight, it's hard to judge what the scene would really look like. It would be useful if GKB was following this thread, as he's spent much of his life photographing one plane from another. Gordon? You out there? |
Posted on 17/06/09 5:27:17 PM |
|
Ben Mills
Luminous Luminary Posts: 570 Reply |
Re: My first time here.
If Gordon is busy there are lots of pictures on this site. http://www.airliners.net/photo/Air-Atlanta-Icelandic/Boeing-747-341/1179938/M/ |
Posted on 17/06/09 7:44:22 PM |
|
Nick Curtain
Model Master Posts: 1799 Reply |
Re: My first time here.
Hi Hubert I agree with Steve - looks much better. From my experience of flying early summer mornings in the UK, a heat haze / mist is fairly common and looks just like the background in your original image. I doubt that the ground, particularly in the far distance, would be that bright and well defined and the revised image, while good, has a surreal quality similar to a flight sim shot. I believe that with thousands of images available from many sources, the key is to find two where the lighting direction matches, as this is half the battle and will save you considerable time adjusting later on. Nick |
Posted on 18/06/09 10:25:00 AM |
|
GKB
Magical Montagist Posts: 4136 Reply |
Re: My first time here.
Sorry it has taken me a little while to pick up on this thread. Been rather busy for a few days but, as of today, I'm a retired person again well, until January at least! Looking over the original image I feel that it is not too far from the correct balance. The second image is just too artificial as the colours are too strong for the time of day suggested by the shadows. The background is typical of the heat, industrial and dust haze that you get over central Europe during the summer months. This has the unfortunate tendency to appear very muddy in photographs. I would guess that the shot was more likely to have been taken late evening rather than early morning as the haze has built up nicely (!) during the day whereas it would subside with night-time conditions. The result of this timing is that the colour temperature is biased towards yellow as blue light gets filtered out. If you go to Window>Info and run the cursor over some neutral, mid-grey parts of the foreground you can see that the blue (B) element is lower than the other two (R & G). If you do the same with a neutral grey part of the aircraft's fuselage you will find that all the readouts are very close together. This suggests that the aircraft was shot much earlier in the day when the blue element is higher. The fact that the aircraft was shot during the earlier part of the day means that the shadows are going to be rather different so we have to fix those as they are too harsh in comparison to the long, soft evening shadows on the ground. The first thing I did was to copy the aircraft to its own layer. On the background layer I increased the contrast using Curves by just moving the bottom slider one box to the right. This helped cut through the haze slightly but not so much that it looked artificial. Then I tried to fix the shadows on the aircraft using Shadow/Highlight. This evens out the lighting on the aircraft and simulates a lower sun angle by making the shadows less harsh. I used 36% for Shadow and 86% for Highlight but there is a wide scope for experimentation here. To get the aircraft to fit better you now have to change its colour balance to a more yellow or orange. I used Layer>New Adjustment Layer>Photofilter>Warming (85) set to 28% to remove some of the blue and get this effect. This was clipped to the aircraft layer. If you now run the Info cursor over the grey areas of the aircraft you will see that the readouts now have similar values to the background grey areas with the blue component being lower. One area that I did not work on is the engine nacelle on the port side of the aircraft which should have all of the sunlit part darkened as the entire nacelle will be in shadow at this sun angle. These are values that I set for my own liking but feel free to experiment with other values. 
_________________ The meek shall inherit the Earth if that's ok with the rest of you. |
Posted on 18/06/09 12:42:39 PM |
|
GKB
Magical Montagist Posts: 4136 Reply |
Re: My first time here.
Just to re-visit the shadow on the engine nacelle. If you copy the starboard nacelle and paste it into position over the port nacelle with a suitable mask you can then just darken it with curves which will save a lot of work cloning out the bright part. _________________ The meek shall inherit the Earth if that's ok with the rest of you. |
Posted on 27/06/09 4:47:12 PM |
|
Hubert
* Posts: 5 Reply |
Re: My first time here.
|
Posted on 27/06/09 4:50:57 PM |
|
Hubert
* Posts: 5 Reply |
Re: My first time here.
I was out of my place for a few days (wedding anniversary), thus the delay. I tried to consider all your comments, and that is the final picture. Gordon, thank you very much for some very specific inspiration. Because I had the base pictures on different layers already, and the background picture was originally very crisp (all the mist is fake, "levels-made"), my workflow was a bit different. (Although measuring mid-grey part components is sth I deffinetly must include in my workflow. Simple but effective way to find the solution here). What do you think about THIS appearance? 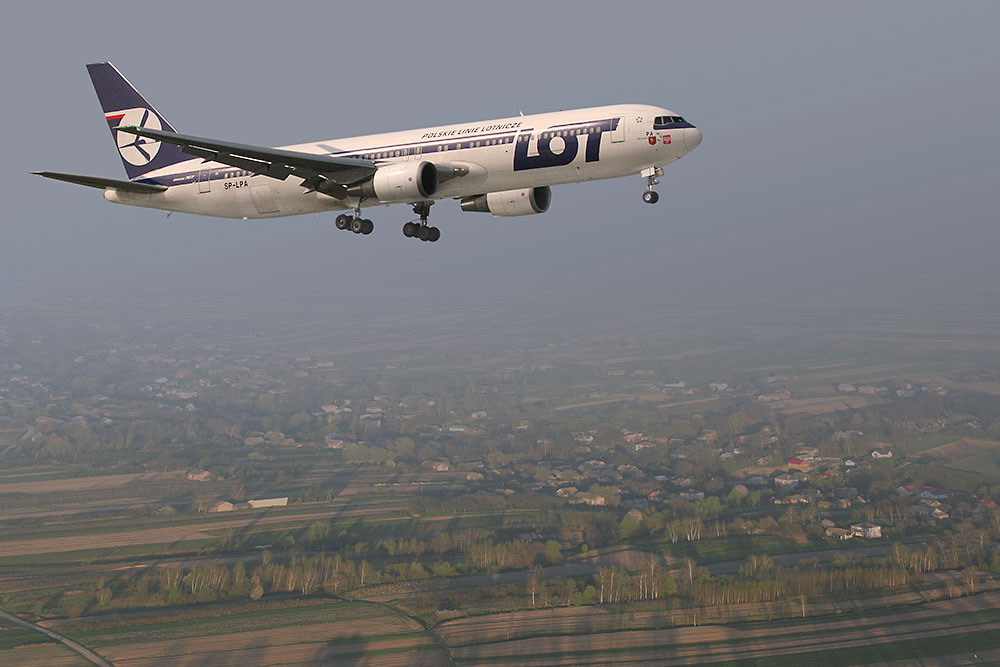
|
Posted on 27/06/09 5:14:32 PM |
|
Hubert
* Posts: 5 Reply |
Re: My first time here.
To unveal the mistery these are the original pictures:  |
Posted on 27/06/09 6:06:21 PM |
|
GKB
Magical Montagist Posts: 4136 Reply |
Re: My first time here.
Hi Hubert, That's probably looking as realistic as it's going to get. I'm so pleased that you included the original background image for us to see. I tried to replicate the image as in your second post but couldn't get anywhere near it for cutting through the haze. Now I realise that it, too, was photoshopped. A very nice realisation of the haze that caused me so many problems as an air to air photographer and which I tried to avoid. My only slight complaint is the shadow of the wingtip which I feel should be a very slightly further forward on the fuselage. Hope to see some more of your work in the Friday Challenge. Gordon. ps.....you let a wedding anniversary get in the way of Photoshop?? _________________ Maturity is knowing when and where to be immature |
Posted on 28/06/09 05:05:14 AM |
|
GKB
Magical Montagist Posts: 4136 Reply |
Re: My first time here.
This is a shot I took a few years ago over southern England of a couple of de Havilland DH60 Gipsy Moths. This illustrates the problem that air-to-air photographers can have with heat and industrial haze. We had to climb to around 3 or 4 thousand feet to get above the haze layer. What you see here is a meteorological phenomenon called a temperature inversion. This happens when two different air masses meet, one above the other. The temperature reduces with altitude as normal until, suddenly, it starts to rise again. The effect is very marked and happens over just a few feet. If you are flying an open cockpit aircraft you can actually feel the temperature increase as you climb through the inversion. The effect of the inversion is to trap all the dust etc and you get a very definite horizon. From the photoshop point of view you cannot cut through the haze to improve the background so either you put up with it or drop in a new background. 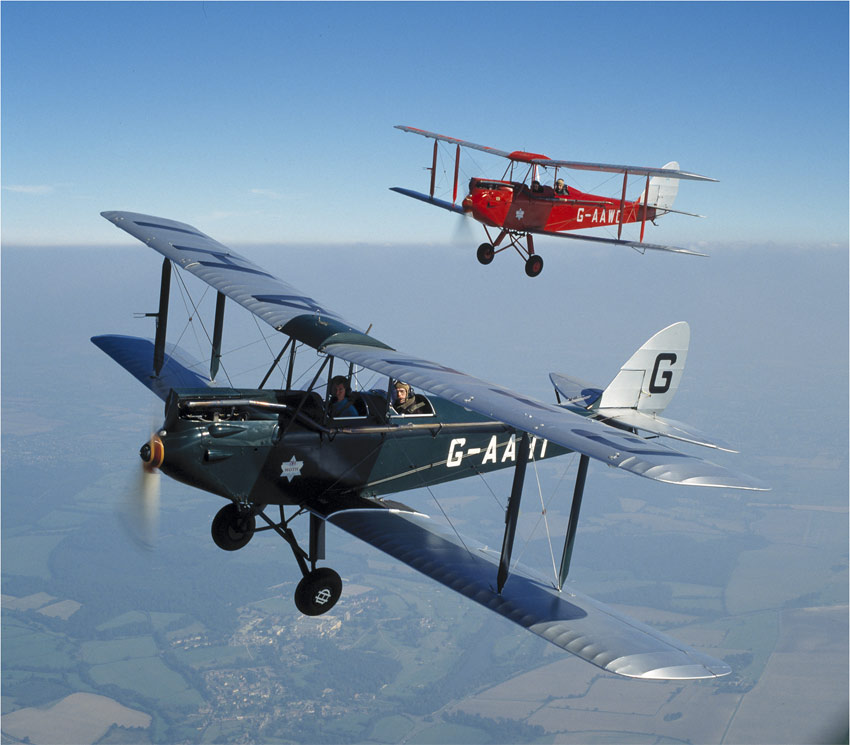 _________________ Maturity is knowing when and where to be immature |