
| » Forum Index » Readers' gallery » Topic: Removing the ugly white line |
|
Posted on 15/08/09 10:01:27 PM |
|
michael sinclair
Off-Topic Opportunist Posts: 1871 Reply |
Removing the ugly white line
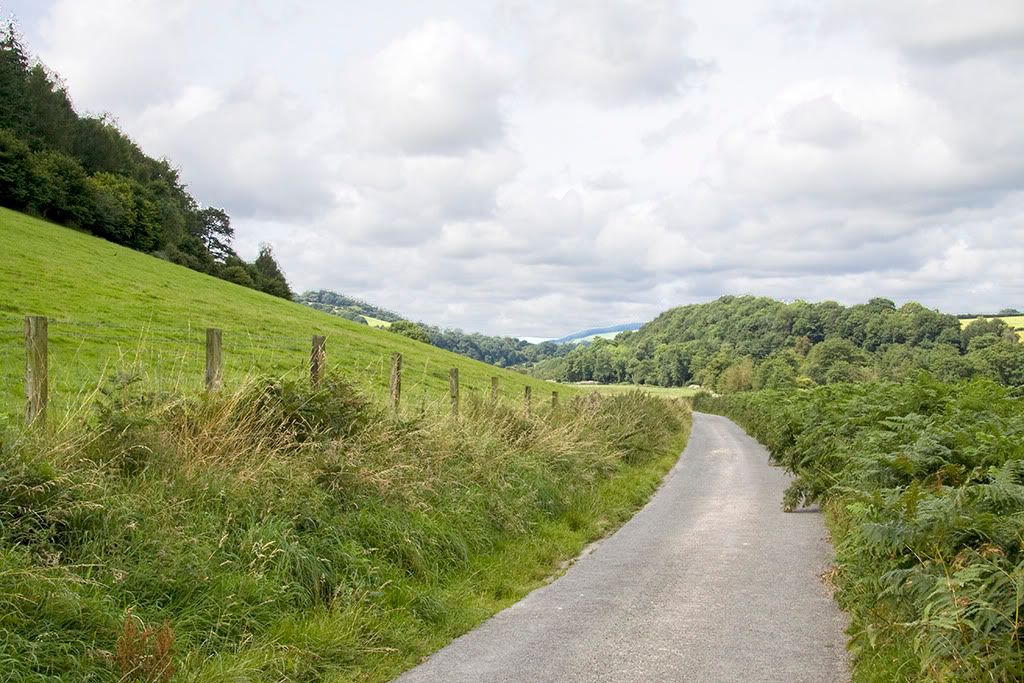
It's possible there are other methods for removing the ugly white line, and I would surely like to hear from anyone who knows an alternative method. How to get the ugly white line: The first image ( from beautiful Herefordshire ) has exposed correctly for the sky, but under-exposed the landscape ( Also note it's better to underexpose than overexpose, as you can always recover from under-exposure but not vice-versa.). So I simply selected the sky, and clicked Inverse so only the foreground and not the sky was selected for adjustment, and in this case Auto-Contrast did the trick as seen in image 2: 
However if we zoom in the third shot we can see the ugly white line: 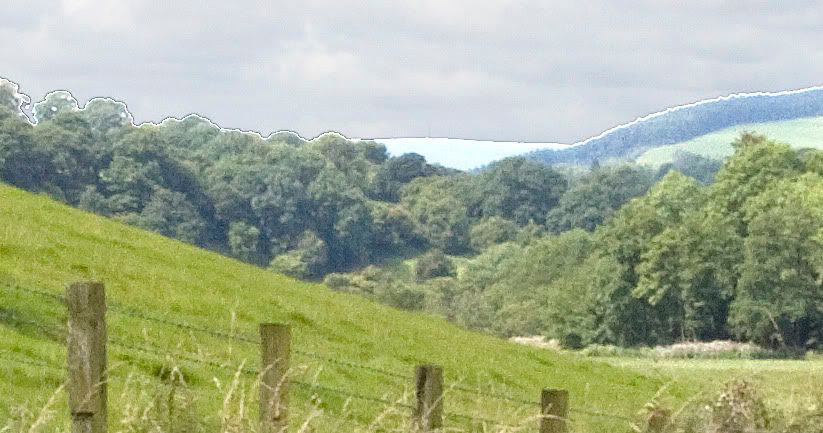
My solution to this problem is first to ensure that there is another layer copy before any adjustments are made; secondly, after having made adjustments to the top layer (as seen in image 2), to select a full soft Eraser brush at 100% (the larger the better) and just clip this white line so that it is erased leaving that part of the layer underneath showing or exposed. Finally, if there is a brightness disparity just lighten the layer beneath: 

Michael 
|
Posted on 16/08/09 07:47:32 AM |
|
Nick Curtain
Model Master Posts: 1802 Reply |
Re: Removing the ugly white line
Hi Michael My personal view is that for a natural looking image, the land is only very slightly under exposed, however it is the sky which is too light and would benefit from far more detail in those clouds. I believe a half way adjustment for both would offer a stronger image. Go to channels and choose the one with the most contrast and copy it. With the new channel active, go to Levels and, with the black eyedropper, force the land and trees to black. Click on the sky with the white eyedropper and force it to white. Paint with black and white to clean up any shades of grey. Copy the background as you have done. Load he channel as a selection and feather by 0.5 or 1 pixel. This will depend on the size of the image. You can then use the selection to create a layer mask, or 'paste into' for a replacement sky, or a levels / curves adjustment. You can then adjust the mask by applying a levels adjustment. By moving the white or black point sliders, you will loosen or tighten the mask. Nick |
Posted on 16/08/09 09:23:46 AM |
|
Nick Curtain
Model Master Posts: 1802 Reply |
Re: Removing the ugly white line
Hi Michael With the version posted, I applied the technique above. I duplicated the background layer and having loaded the channel as a selection, I then created a layer mask, so that the land element was hidden. The blend for the copy layer was set to multiply to give the sky some punch and I then tweaked the mask using levels. I then merged the layers and applied dodge to the land with brush set to highlights and burn to the sky with the brush set to shadows. Both were set to 5% with only a small amount applied. I created a Curves adjustment layer above the layers and pushed the curve up until the land was lit sufficiently. I Inverted the curves mask, so it became 'hide all' and then painted white on the land portion selectively. It is important to mention that the technique using channels works much better with high res images, whereas with this 'saved' image, the skyline is not that well defined, but think if you try this on your original file it should work well. Hope this helps Nick 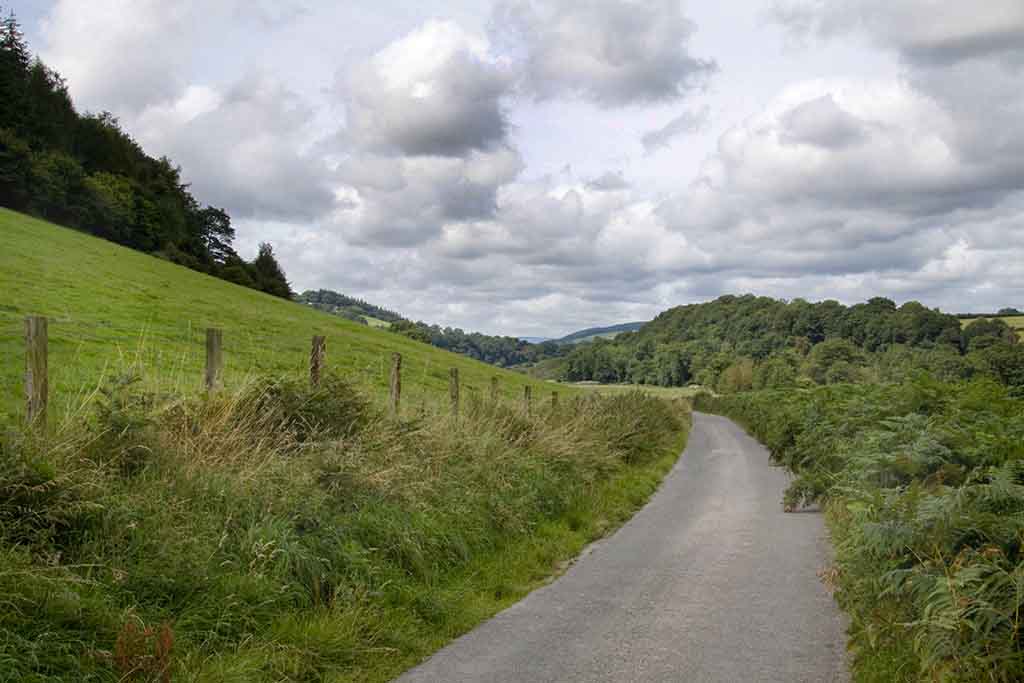
|
Posted on 16/08/09 3:16:53 PM |
|
michael sinclair
Off-Topic Opportunist Posts: 1871 Reply |
Re: Removing the ugly white line
Hi Nick, Thanks, that was helpful: first the sky does look better. Believe it or not that's the first time ( I practised what you said) I have used the "ole Dodge-n-Burn tool--very useful, and will use it to enhance skies in the future. However, I did notice both on my practise pic and the modified one you posted that the ugly white line remains, and therefore my method or another is necessary for removal. Michael  |
Posted on 16/08/09 3:52:06 PM |
|
Nick Curtain
Model Master Posts: 1802 Reply |
Re: Removing the ugly white line
Ah I see what mean and I believe that it is attributable to the resolution of the image and possibly some lens fringing. The original image you posted does contain a white line. Does the high res version? When I painted on the mask, there were some slightly grey areas on the skyline however, I did not give them much thought because the white line you showed in the example image was much more pronounced and I put this down to the fact that the sky has possibly been selected with the wand??. I worked on an image of mine taken in Paris recently and I wanted to remove ugly TV ariels from buildings which appeared through an archway. The image was taken with a 10D and standard 24-85mm lens. At high magnification there was noticeable fringing around the chimney tops and I simply cloned out the artifacts with a tiny soft brush, sampling from the sky immediately adjacent to the destination point. Nick |
Posted on 16/08/09 6:28:07 PM |
|
michael sinclair
Off-Topic Opportunist Posts: 1871 Reply |
Re: Removing the ugly white line
Yes, I had used the Magic Wand to select the sky--does that make a difference?  |
Posted on 16/08/09 7:27:46 PM |
|
Nick Curtain
Model Master Posts: 1802 Reply |
Re: Removing the ugly white line
Yes Michael, the wand selects pixels based on luminosity values within the channels and with all those lovely clouds in the sky, there could be hundreds of different shades of colour levels. You can adjust tolerance, but it's rather hit and miss. That said, the Wand is great for areas of continuous tone, so if you have made a template with black squares on a white background, for example, then the wand is perfect for selecting a square in which to paste an image. I think the wand is a rather quick and dirty way of selecting in photos, but other tools, the pen for example, would be no good for this job. As for the background eraser, Adobe should remove this useless tool altogether. Perhaps it's me, but I think it does half a job sometimes and I just cannot get on with it. Each to his own though. For tasks like your image and selecting hair, I prefer using channels and sometimes there is just no way round labourious painting on a mask, but life can be made easier by setting the brush to overlay mode, so that painting white on the darker pixels will have no effect and the same applies to black on white. Nick |
Posted on 16/08/09 8:32:58 PM |
|
michael sinclair
Off-Topic Opportunist Posts: 1871 Reply |
Re: Removing the ugly white line
Thanks again Nick for that info: I didn't know that painting in Overlay mode with black or white would not overspill onto its opposite. Michael  |