
| » Forum Index » Link-fest » Topic: Autostitch: to make panoramas... update in the last page |
|
Posted on 02/04/06 8:25:17 PM |
|
vibeke
Kreative Kiwi Posts: 2205 Reply |
Re: Autostitch: to make panoramas...
 |
Posted on 02/04/06 8:26:40 PM |
|
vibeke
Kreative Kiwi Posts: 2205 Reply |
Re: Autostitch: to make panoramas...
I'm working on reposting. I need a new computer, ever since I started getting quotes on a new one, this one slows down, crashes etc. |
Posted on 02/04/06 8:56:34 PM |
|
vibeke
Kreative Kiwi Posts: 2205 Reply |
Re: Autostitch: to make panoramas...
I Know, my computer doesn't like me this morning. Ever since I started geting quotes for an upgrade, it has been playing up. Lets see if the photos turn up this time. 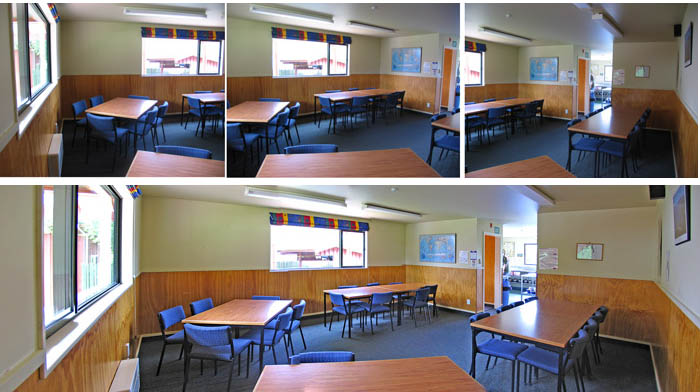 |
Posted on 20/04/06 04:07:00 AM |
|
Pierre
Constructional Confabulator Posts: 637 Reply |
Re: Autostitch: to make panoramas...
Look at this... Even if your pictures are taken by a drunken fellow, Autostitch will straighten them up! Note that I unchecked the "auto-straighten" in the options... Go figure... 

See the pictures that were not used by the software? Even straight ones! _________________ |
Posted on 20/04/06 08:39:16 AM |
|
Bob
Expert Expressionist Posts: 130 Reply |
Re: Autostitch: to make panoramas...
"Auto-straighten" has nothing to do with matching the pictures. "Auto-straighten" attempts to detect the horizon in the merged panorama and straighten it. Panoramas without a clearly defined horizon will probably need to uncheck this option. The parameters in the options section are rather obtuse. Would you like me to post my interpretation of what they mean? |
Posted on 21/04/06 02:12:58 AM |
|
Pierre
Constructional Confabulator Posts: 637 Reply |
Re: Autostitch: to make panoramas...
Please do! _________________ |
Posted on 21/04/06 06:21:50 AM |
|
Bob
Expert Expressionist Posts: 130 Reply |
Re: Autostitch: to make panoramas... update in the last page
This is a combination of what I've figured out and what's in the Autostitch readme file. I'll describe the options as presented in the Autostitch options screen (top to bottom and left to right). Output Size: After stitching and cropping, the image is scaled according to the size specified. You may specify a fixed width in pixels, or a fixed height in pixels, or do a relative sizing using a scaling factor in percent. The aspect ratio of the stitched image is preserved. I use the default small scaling factor for test runs or while playing with the option settings and 100% scale for the final. I prefer to do the final cropping and sizing in Photoshop. The specific height/width settings would be most handy if you had no photo editing program. Rendering Options: Blending Method "None", will give you the original images with no blending. "Linear", will do a simple weighted average of the image intensities in each image. "Multi-band" is more complex but gives the best blending, it uses spatial frequencies of the intensity. The basic idea is to merge high frequencies over a short distance and low frequences over a large distance. The default is 2 frequency bands. It's not clear how the program is handling the blend if more than 2 bands is specified. The research paper I read just indicated it was problematic. The sigma value has to do with the statistical weighted blending of the bands. I assume it has to do with the distribution curve and how many standard deviations from the mean to include in the weightings. Gain Compensation: Gain compensation modifies the brightness of the images so they are consistent with each other. Dark images become brighter and light images become darker. This appears to be a normalized statistical adjustment using the mean and standard distribution. Increasing sigma increases the effect. If saturation occurs, you'll need to decrease the sigma or the mean. I haven't had to play with this, I match exposures at the time of shooting and haven't had any issues. I leave gain compensation off. Crop Settings: Autostitch computes adjustments in a spherical coordinate system. Think of the camera as being at the center of a sphere. Cropping refers to limiting the angles subtended by the stitched image in this system rather than the physical dimensions of the output image. Auto is probably the best bet unless you have a need to fit the image to a specified angular size in degrees. The Theta values correspond to the left and right yaw angular measures (longitude in the readme). The Phi values correspond to the bottom and top pitch angles (latitude in the readme). Matching Options: SIFT is the part of the program that extracts features in the overlapping areas for potential matches. Size has to do with the size of the region that it searchs for features. Too small and it might not find enough to do a good match. Too large and you increase the time it takes to process considerably. You can specify size in pixels or in a percentage of the image size. The pixel default is probably OK. That represents roughly 20% overlap in a 3MP image. RANSAC is the statistical method whereby the extracted features are compared and the probability of a match is calculated. The parameters aren't defined anywhere that I could find, so I don't know what they represent. If I get time, I may research this further. The readme says try decreasing alpha and beta if no match is found or increase them if incorrect matches are assigned. My experiments have found matches are very sensitive to beta. If you need to adjust these settings, adjust alpha until you get in the ballpark and fine tune with beta. You'll probably not need to adjust these settings unless you have too small of an overlap to find adequate match points or there is a repetitive pattern that fools the algorithm. You can probably leave the number of iterations alone. Orientation Settings: Auto straighten has to do with the horizon line. If the panorama images were not taken with the camera level, the geometric transformations that are done to stitch together the images and superimpose the matched features can result in the horizon being vavy (actually, it will be a sine wave). Auto Straighten will attempt to recognize this and try to make the horizon line straight again. It mostly works, but if you don't have a clearly defined horizon it can distort the image. If you get "mushroom" shaped stitched images, try turning this off. The Manual orientation settings let you tweak the image orientation. Again, think of the camera as being at the center of a sphere. Theta is yaw, Phi is pitch, and Psi is roll. The values are in degrees. Image Rotation: This option applies to the completed stitched and scaled output image. Basically, it allows you to rotate the image 90 degrees left or right or by 180 degrees. You can, of course, do this in Photoshop. Other Options: System memory specifies how much memory Autostitch can allocate. Too much can "starve" the rest of the system and result in an "out of memory" message. Too little slows down the program. JPEG quality controls the JPEG compression with 100 being the maximum quality (least compression). Hope you find this useful. |
Posted on 21/04/06 9:27:20 PM |
|
Pierre
Constructional Confabulator Posts: 637 Reply |
Re: Autostitch: to make panoramas... update in the last page
Bob, this is exactly what a lazy bum like me needed. It is why I also bought HTCIP. I don't have to go through the Readme...  _________________ |
Posted on 22/04/06 00:59:02 AM |
|
DaltonX
Raster Reanimator Posts: 259 Reply |
Re: Autostitch: to make panoramas... update in the last page
fantastic bob.... makes more sense now.... thanx for all your hard work and time in researching this for us..... very much appreciated indeed! 
_________________ DaltonX |
Posted on 08/06/06 03:17:06 AM |
|
mguyer
Incisive Incisor Posts: 799 Reply |
Re: Autostitch: to make panoramas... update in the last page
this is amazing...this started out as 11 pictures and took about 30 seconds to complete  |
Posted on 12/06/06 03:22:27 AM |
|
Pierre
Constructional Confabulator Posts: 637 Reply |
Re: Autostitch: to make panoramas... update in the last page
I wish theyt would offer a 360° viewer to insert a complete panorama in and view a scene in Virtual Reality (like they have in cars manufacturers website). We could visit your house this way!  _________________ |
| page: 1 2 last |