
| » Forum Index » Art & Design in Photoshop » Topic: 09.02 point 5 |
|
Posted on 06/10/09 9:48:45 PM |
|
evandijken
* Posts: 6 Reply |
09.02 point 5
I'm working with CS3 in Windows and I don't understand how to make cracks in the stone. Probably someone can show me, excactly step by step how to do this? Point 6 also? Thank you, Eric |
Posted on 07/10/09 08:16:02 AM |
|
Steve Caplin
Administrator Posts: 7178 Reply |
Re: 09.02 point 5
OK, this is not so hard. Here it is step by step: 1. Make a new layer above the type layer. Select them both in the Layers panel, and press alt-ctrl-G to make a clipping group with the layer beneath (the stone). Now, anything you paint on this new layer will only be visible where it overlaps the stone layer. 2. Set the foreground colour to grey, and us the Lasso tool to make an irregular crack-shaped selection, then press alt-backspace to fill this selected area with the grey colour. 3. Repeat this process several times, to make cracks all around the edge of the stone - or wherever you want them. 4. Change the mode of this layer from Normal to Hard Light. The cracks should now become almost invisible. 5. Switch to the Text layer, select the layer style in the Layers panel, and hold alt as you drag it to the cracks layer. This makes a copy of the layer style in that layer. That should be it! Let us know how you get on. Welcome to the forum! Steve |
Posted on 07/10/09 3:52:49 PM |
|
evandijken
* Posts: 6 Reply |
Re: 09.02 point 5
Thank you very much Steve for your fast response! But! Most of the time you told me WHAT to do not HOW to do... I'm not stupid and I want also to learn, I dont know much from CS3. Here's what I mean, I got allready stuck by point 4: 1. Make a new layer (HOW?) above the type layer . Select them both (HOW?) in the Layers panel, and press alt-ctrl-G to make a clipping group with the layer beneath (the stone). Now, anything you paint on this new layer will only be visible where it overlaps the stone layer. 2. Set the foreground colour to grey, and us the Lasso tool to make an irregular crack-shaped selection, then press alt-backspace to fill this selected area with the grey colour. 3. Repeat this process several times, to make cracks all around the edge of the stone - or wherever you want them. 4. Change the mode of this layer (HOW?) from Normal to Hard Light (WHERE?). The cracks should now become almost invisible. 5. Switch to the Text layer (HOW?), select the layer style in the Layers panel (WHAT DO YOU MEAN?), and hold alt as you drag it to the cracks layer. This makes a copy of the layer style in that layer. |
Posted on 08/10/09 09:22:12 AM |
|
Deborah Morley
Makeover Magician Posts: 1319 Reply |
Re: 09.02 point 5
Hello evandijken, I have tried to answer some of your questions. Have you got Steves other book; How to Cheat in Photoshop, as it would help you to learn some of the basics of Photoshop. 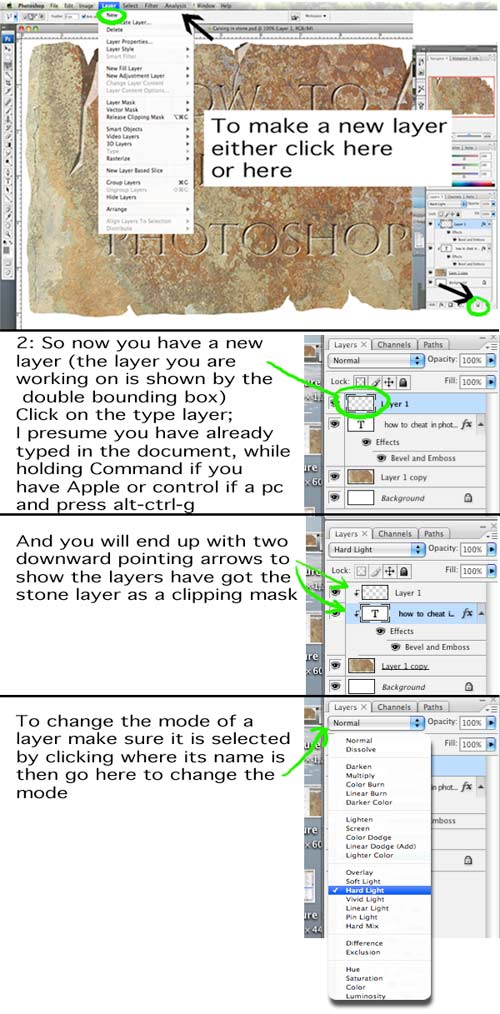 |
Posted on 08/10/09 6:01:59 PM |
|
evandijken
* Posts: 6 Reply |
Re: 09.02 point 5
OK Deborah! Thank you really very much for making this clear for me. Not at least the way you did. I made it! Yeah..., till point 6 (inclusive) in the book! Point 7, I don't understand (chipping the craks) and point 8 is even harder. Probably you are so kind to unlock these last secrets for me? Thank you in advance, sincerely, Eric |
Posted on 08/10/09 6:30:58 PM |
|
evandijken
* Posts: 6 Reply |
Re: 09.02 point 5
This is what I've now:  |
Posted on 08/10/09 7:10:00 PM |
|
Deborah Morley
Makeover Magician Posts: 1319 Reply |
Re: 09.02 point 5
Hello Eric, You are getting there! I don't really know how to help on point 8. As long as you haven't rasterised the type just select the type tool, making sure the type layer is selected, move the cursor until the type is active, then type what you want. Point 7 is shown below  |
Posted on 08/10/09 8:37:18 PM |
|
evandijken
* Posts: 6 Reply |
Re: 09.02 point 5
Thank you so much, Deborah. You are talking (writing) about painting in black and white, I'm oainting in grey and white as you can see. What am I doing wrong this time? This is what I get: Eric  |
Posted on 08/10/09 9:18:39 PM |
|
Deborah Morley
Makeover Magician Posts: 1319 Reply |
Re: 09.02 point 5
Hello Eric, It looks like you didn't make a clipping mask of layer one; the layer you drew the cracks on, to the stone layer. Make sure you see the downward facing arrow on that layer. That should sort it. |
Posted on 09/10/09 10:02:39 PM |
|
evandijken
* Posts: 6 Reply |
Re: 09.02 point 5
Thank you Deborah, Aftel much trying, I made it. You where a big help! This is what I made, the craks aren't that beautifull but that doesn't matter for now. I know how to work. Just a bit more practising. Eric 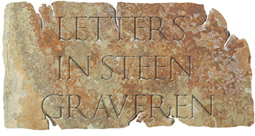 |
Posted on 09/10/09 10:30:24 PM |
|
Steve Caplin
Administrator Posts: 7178 Reply |
Re: 09.02 point 5
Eric - that's looking excellent. Deborah - many thanks for being such a great help with this one! |
Posted on 10/10/09 11:06:10 AM |
|
Deborah Morley
Makeover Magician Posts: 1319 Reply |
Re: 09.02 point 5
Well done Eric, now on to the next one! Glad to have been able to help! |