
| » Forum Index » 100% Photoshop » Topic: Shapes tool |
|
Posted on 16/01/11 01:14:35 AM |
|
joeysala
Perfect Palmist Posts: 604 Reply |
Shapes tool
Help please! Chapter 4, step 14. I know NADA about this tool and am going batty trying to figure it out! ANY help greatly appreciated! Thanx, Joey |
Posted on 16/01/11 09:04:00 AM |
|
Nick Curtain
Model Master Posts: 1800 Reply |
Re: Shapes tool
Hi Joey I think you are referring to creating the numbers for the watch on page 83? The shape tool can be used to create filled shapes or paths. There are presets and custom shapes. Make sure you select the ellipse tool and that paths are set in the options bar at the top of the screen. If you hold ALT / Shift as you drag from the centre of the face, you'll create a circular path. This is explained in chapter 2 You can type text along a path and you'll see the cursor change as you cross the path with the type tool selected. You can space the letters, or delete spaces, just as you would typing normal text. I have stroked the path to make it more visible. I cannot see what font Steve has used, but you'll see from the enlarged character dialogue box that I've reduced the spacing. By experimenting with letter spacing you will make the numerals fit the 5 minute marks. Hope this helps. Nick  |
Posted on 17/01/11 08:33:37 AM |
|
Steve Caplin
Administrator Posts: 7161 Reply |
Re: Shapes tool
I think this is probably a more general Shapes tool enquiry. I've covered it in the latest edition of How to Cheat in Photoshop CS5, but here's a quick run-down... First, choose the Shapes tool. It looks like a grey rectangle (or star, or ellipse - the icon changes depending on which Shape is currently selected.) Here's how the tool's Options bar works: 
A: This section determines which of the tool's three different modes you're using. The first draws Shape layers. These are vector layers defined by Pen paths: you can't paint on them, but you can change their colour and layer styles. The second button allows you to draw a Pen path, using the Shapes tool. This path can then be turned into a selection if you wish, which you usually do. The third button paints regular pixels using whichever Shape you've chosen. In general, you'll probably be using the tool to create Pen paths, when you can then adjust and turn into a selection. B: The next section lets you choose the shape you want to draw - except the first two icons simply select the Pen and Freeform Pen tools. After those it's rectangle, round-cornered rectangle, ellipse, polygon or star, line, and custom shape. The final down-pointing arrow sets the options for each shape - for instance, if you've chosen the polygon, this lets you turn it into a star, set the indent amount, and so on. C: Specific options. This varies with the selected shape. For the round-cornered rectangle, it lets you specify the roundness of the corners. D: Intersection modes. This determines how subsequent shapes and paths interact with each other - whether they add to each other's selections, subtract form them, intersect with them, and so on. Does this help? |
Posted on 17/01/11 11:00:06 AM |
|
joeysala
Perfect Palmist Posts: 604 Reply |
Re: Shapes tool
Well, it sure can't hurt!!! Yes, it definately helps - also Nick's suggestions. I'm struggling, but it will make sense...eventually! Thanks a lot......Joey |
Posted on 19/01/11 09:41:22 AM |
|
joeysala
Perfect Palmist Posts: 604 Reply |
Re: Shapes tool
Well, it's official. I will never be able to make text type around the edge of a circle. Ergo, I will not be able to do the pocket watch face, or the writing on the coin! And, I'll never be able to make a rubberband, either! WAHHHH! I think it is a conspiracy! Seriously, I don't know what the heck I'm missing, but obviously something! Well, I don't give up easily - I'll (eventually) figure it out. Aside from this, I'm having fun "filling" my drawer! Joey |
Posted on 19/01/11 12:20:33 PM |
|
Jota120
Ingenious Inventor Posts: 2615 Reply |
Re: Shapes tool
Oh Joey, I'm sure you will not give up! I don't  It gives great rewards after the pain and goes faster and faster It gives great rewards after the pain and goes faster and faster 
Which version of PS are you using? As I recall the text warp in earlier versions was not so powerful. But is okay can still achieve the results other ways. |
Posted on 19/01/11 1:45:05 PM |
|
joeysala
Perfect Palmist Posts: 604 Reply |
Re: Shapes tool
I'm using PS 7. This is what comes from being self-taught, I think. I got real comfortable with what was easy..there is soooo much I don't know, and I'm stunned by what I've learned since getting 100% PS and Art & Design in PS. I'm thinking I might hire a high-school kid to show me a few things....Joey |
Posted on 19/01/11 2:41:59 PM |
|
Jota120
Ingenious Inventor Posts: 2615 Reply |
Re: Shapes tool
Joey, In my opinion the most important algorithms are there in PS 7. You will have to work harder though to achieve what has become much easier in later versions of PS. E.g as I recall you can't warp text as Nick says. Saves much time in later versions. I think Nick's and Steve's excellent comments were based on later versions. All guys work on different versions here. I think Steve and all have no bias. I was grounded on PS 7, so no problem, but CS4 saved me so much time. CS5 more complicated. My poor PCs starts giving up with requirements for memory, graphic card. PS upgrades are expensive. I'm not the product manger for Adobe, but I think the engineers work very hard for their product and need a salary. You can do it. Rasterize the text and (sorry no warp in PS 7), so maybe do each character and rotate so just right in each new layer. All the styles for the layer still unchanged I think. Trevor |
Posted on 19/01/11 3:58:55 PM |
|
GKB
Magical Montagist Posts: 4142 Reply |
Re: Shapes tool
Don't worry Joey; we were all there once. The best way to learn is practice so get going with the Friday Challenges and try setting yourself your own challenges. Photoshop 7 is perfectly ok. It is still a powerful piece of kit and most of the challenges can be done using this version without any difficulty. Gordon _________________ Why isn't 'phonetic' spelled the way it sounds? |
Posted on 19/01/11 4:32:02 PM |
|
Luis
Six-String Synthesist Posts: 236 Reply  |
Re: Shapes tool
Hi Joey. Like Trevor said, it is more work but it can be done. Just to let you know, I also use PS 7. To make this easy to follow, I'm going to use a 600 x 600 document size for the pocket watch. 1. First thing you need to do is make sure you have Snap to Guides selected. Go To: View > Snap To > Guides. You are going to create two guide lines ( 1 vertical and 1 horizontal). Go to View > New Guide. When the dialog window appears for the Horizontal, type in 300 and click OK. Now repeat this again, but type in 300 for the Vertical. Now you have the center for the circle. 2. NOw use the Shape tool or the Eliptical Marquee Tool and start from the center to create a circle. Now folow steps 11-13 in the book on a new layer. 3. NOw for the Numbers. Create each number on its own layer. Don't worry about being perfect. 4. Now link each of the number layers together by clicking the square next to the eyeball. 5.Now select the move tool. In the Options bar, click on Align Vertical Center. Still in the Options Bar click on Align Horizontal Center. NOw all the number should look like it overlapping each other. 6. Make sure all the number layers are still linked and bring up the Free Transform (Ctrl T). If you look at the center of the Free Transform, you will see an anchor point. Now move the free transform box (not the anchor point) so that the anchor point snaps to the vertical guide line and move the numbers close to the ticks. Now unlink the text layers by clicking on the link and turn off all layers by poking the eyeball except for number 1 7. Make sure the number 1 layer is selected, bring up the free transform and move the anchor point to the center point of the guide line. Now rotate the number by 30 degree. You can also type in the degree number in the Options bar for the rotation. Once done, press enter to apply the transformation 8. Now turn on the number 2 layer and repeat the last step. For the rotation, type 60 in the options bar. Now keep doing this for each number. 
I hope this helps. Luis |
Posted on 19/01/11 5:45:52 PM |
|
joeysala
Perfect Palmist Posts: 604 Reply |
Re: Shapes tool
Immensely! Thanx Luis, Gordon, Trevor. Got my fingers crossed! I'll post the results (if they're not embarrassing). Any suggestions re. why I can't make a rubberband??? The Pen tool and I just don't get along! It wins every argument! Joey |
Posted on 24/01/11 02:08:04 AM |
|
joeysala
Perfect Palmist Posts: 604 Reply |
Re: Shapes tool
Luis, et al- I finally finished the watch face and it's pretty good - thanx for the information! Now for the rubberband - I've been fighting with it for hours and hours, to no avail. My pen tool hasn't seemed to work right since I upgraded from Windows 2000 to XP. Or, I just keep missing a vital step. ANY help is more than welcome! In the meantime, here is something I did for my desk drawer---all 100% Photoshop! I DID want to cheat a few time, but stuck to my guns - 'cause it's true: when you finally "get it", it is worth the struggle! 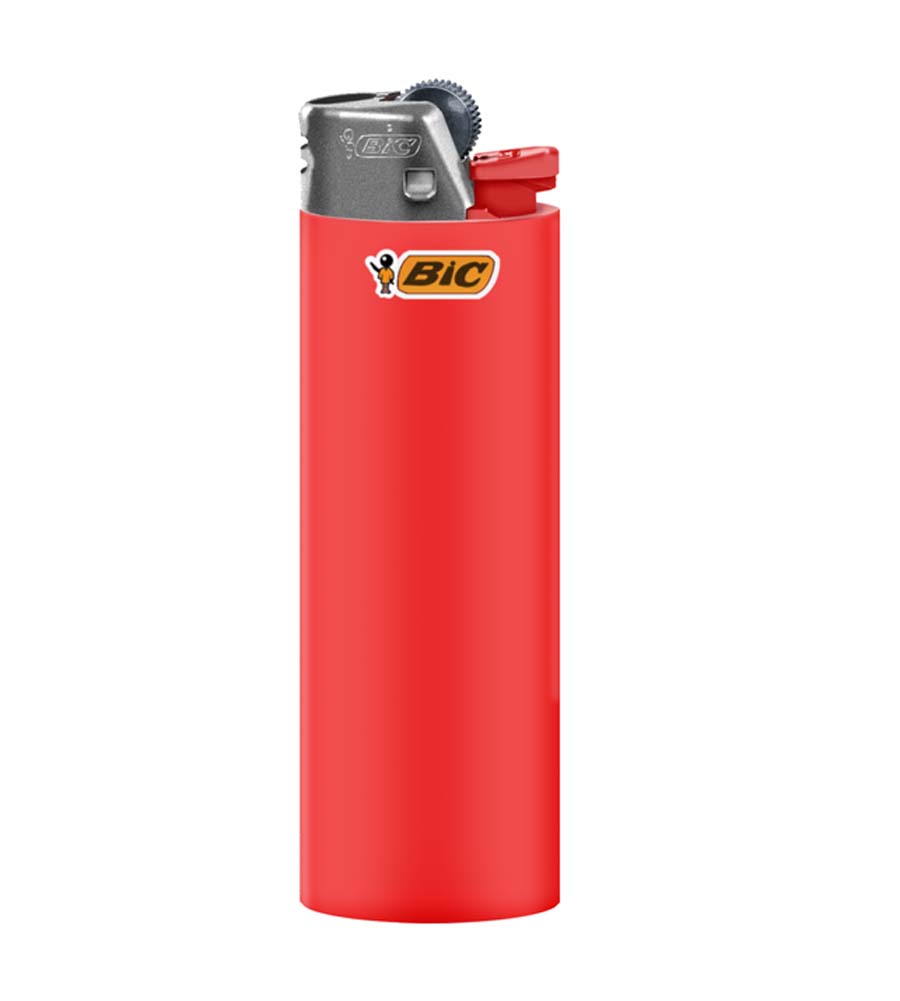 |
Posted on 24/01/11 2:19:57 PM |
|
Jota120
Ingenious Inventor Posts: 2615 Reply |
Re: Shapes tool
Very impressive Joey! Not sure how you made all the detail in the top part, but looks great. I like the pen tool and works fine with XP for me. I don't use the rubberband tool option, it drives me crazy; just scoot around manually with pen, quite fast. Have to use History and Ctrl Z to skip back/fwd when start going to fast and not quite as what wanted.
Looking forward to the rest of your Draw
Trevor |
Posted on 24/01/11 3:52:21 PM |
|
Luis
Six-String Synthesist Posts: 236 Reply |
Re: Shapes tool
Hi Joey, There are several ways on creating this. Each method will give use some ideals on creating shapes using the pen tool. Method 1: If you take a look at the example of the rubberband in the book, (pg 85) you will see 5 points on one of the rubberbands. If you you connect the dots, you will get a shape like the one I did shown below. This was done just by clicking with the Pen Tool. With the shape I created, shown in Step 1, now we have to create a curve. STEP 2. Hold down the ALT key and move your cursor over to one of the points until it changes to a V like shape. STEP 2a. Keep holding down on the Alt key and click and hold the mouse button on one of the points. NOw move your mouse up or down or whatever the direction you want the curve to look like. Once you find the curve you like, let go of the mouse button. STEP 3. Keep doing this for all the point 
Methode 2: Make sure you have the pen tool selected. 1. Click to create your first point. 2. Now click to create your second point but do not let go of your mouse button. NOw move your mouse up or down or whatever the direction you want the curve to look like. Once you find the curve you like, let go of the mouse button. Kepp doing this to create your rubberband shape. Then continue with the directions in the book. I hope this helps some. Luis |
Posted on 24/01/11 5:06:18 PM |
|
Steve Caplin
Administrator Posts: 7161 Reply |
Re: Shapes tool
Joey - fantastic lighter image! Looks photographic to me! |
Posted on 25/01/11 01:31:12 AM |
|
joeysala
Perfect Palmist Posts: 604 Reply |
Re: Shapes tool
Trevor - I was stunned by how much stuff is going on with a simple lighter! I broke the top part into two sections - the metal and the plastic - then focused on value and shape. And, I used a LOT of what I've learned since opening 100% PS! I also began recording each step - (see attachment) - but I kept forgetting. Steve - thanx for the kind words - Luis - I'm trying your suggestion as soon as I send this. Anyway, I'm loving this beyond words! Joey ps - by the way, it isn't "cheating" because I used a photo as source, is it? |
Posted on 25/01/11 01:33:25 AM |
|
joeysala
Perfect Palmist Posts: 604 Reply |
Re: Shapes tool
OOOPS! 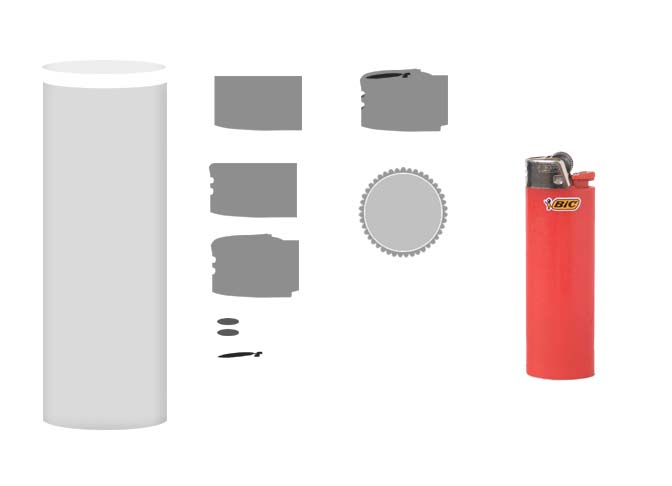 |
Posted on 25/01/11 3:52:32 PM |
|
Jota120
Ingenious Inventor Posts: 2615 Reply |
Re: Shapes tool
Joey, Thanks for sharing further details. Re: Ps: In my opinion, from an Art perspective, we can make images a) from imagination, b) observation to learn (Life Class etc). I think it is good to work from real life, memory and imagination. Real life is not practical many times. I've, and many others, then use a photo as aid memoir for the detail of something observed. For example, trying to paint wild Scotland, just take a sketch/paint and notes, photo, before the rain, snow and then the light fails. So photo as a reference is fine IMHO, and hey, it helps to learn 100% PS with excellent results. Its great you apply/create with your own objects, which I think is important aim from Steve. Maybe Steve has an opinion in the context of "100% Photoshop"? Now I've found an old lighter similar to yours. I see more now and understand the complexity you want to render. No wonder it took a LOT of effort! Trevor |
Posted on 29/01/11 02:39:08 AM |
|
joeysala
Perfect Palmist Posts: 604 Reply |
Re: Shapes tool
Re: rubber bands............I did it! After at LEAST 50 tries and as many hours (following directions to the letter) and having NO luck, something finally clicked. Step 3 - extruding the bands - simply did not work. Nothing, nada, zilch. Directions say "hold the alt key" ........nothing. In my frustrarion I tried sooo many different things - and then I held alt AND ctrl.........and it worked! The rest just fell into place, just like Steve said it would. Is this something I just should've known, or was something accidentially left out of the directions? Well - now I can go forward and face the next challenge! I'm attaching my rubber bands -no big deal, but am VERY proud of them, and there is no one home to appreciate them! Joey  |
Posted on 29/01/11 02:49:56 AM |
|
Luis
Six-String Synthesist Posts: 236 Reply |
Re: Shapes tool
Joey, Your rubber bands look excellent!! I'm glad you were able to complete this task in the book. Luis |