

| » Forum Index » Problems and solutions » Topic: Tunnel Shape Interior |
|
Posted on 14/03/22 4:33:45 PM |
|
tom8gem@gmail.com
* Posts: 50 Reply |
Re: Tunnel Shape Interior
Thank you David; I did have challenges with perspective on this. These will be more complicated to correct; I think I'll wait for others to weigh in before making the attempt. |
Posted on 14/03/22 4:33:45 PM |
|
tom8gem@gmail.com
* Posts: 50 Reply |
Re: Tunnel Shape Interior
Thank you David; I did have challenges with perspective on this. These will be more complicated to correct; I think I'll wait for others to weigh in before making the attempt. |
Posted on 14/03/22 4:37:47 PM |
|
tom8gem@gmail.com
* Posts: 50 Reply |
Re: Tunnel Shape Interior
Thank you David, I did have challenges with perspective on this one. These will be more difficult to correct (than the lighting issue). I think I'll wait for others to weigh in before making the attempt. |
Posted on 14/03/22 6:47:59 PM |
|
DavidMac
Director of Photoshop Posts: 5672 Reply  |
Re: Tunnel Shape Interior
Hi again Tom Once again this is very crude but this is how I believe the perspective should work. I have very slightly tweaked the ground plane of your image inside the tunnel to make it conform to my grid but I cannot tweak the cylindrical sides and top as the distortions needed are far too extreme. They would need to be re-drawn. Let's see what others have to say. Click in the image to enlarge. 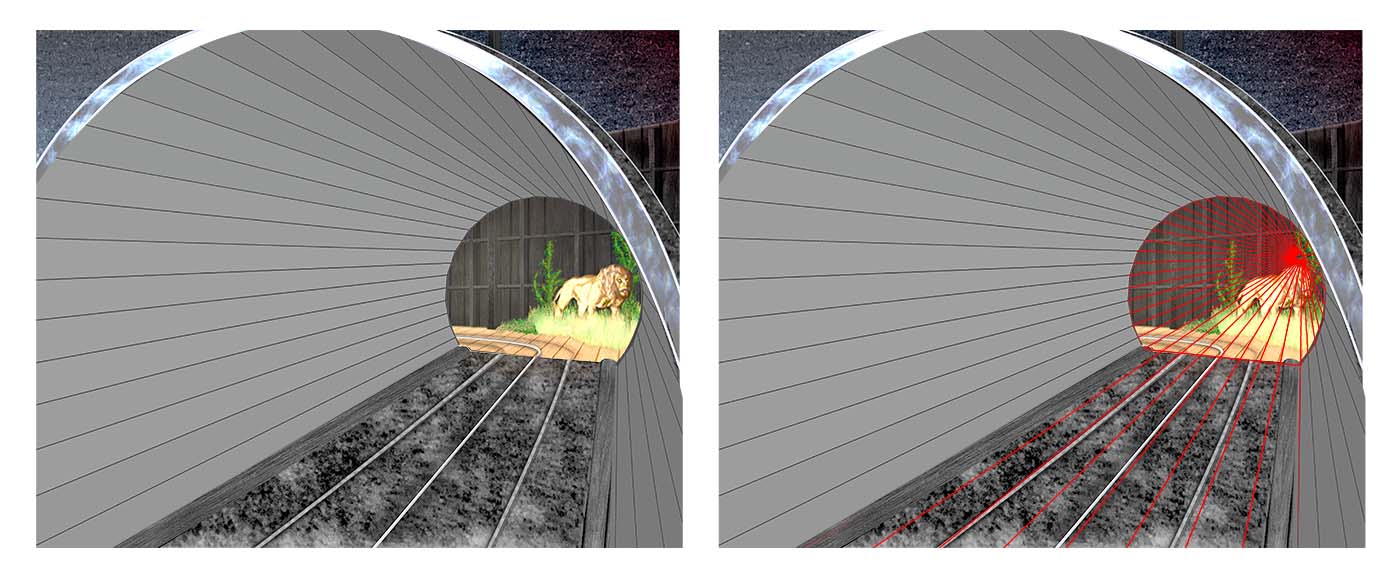
_________________ The subtlety and conviction of any Photoshop effect is invariably inversely proportional to the number of knobs on it ....... |
Posted on 14/03/22 7:20:54 PM |
|
tom8gem@gmail.com
* Posts: 50 Reply |
Re: Tunnel Shape Interior
 |
Posted on 14/03/22 9:53:57 PM |
|
tom8gem@gmail.com
* Posts: 50 Reply |
Re: Tunnel Shape Interior
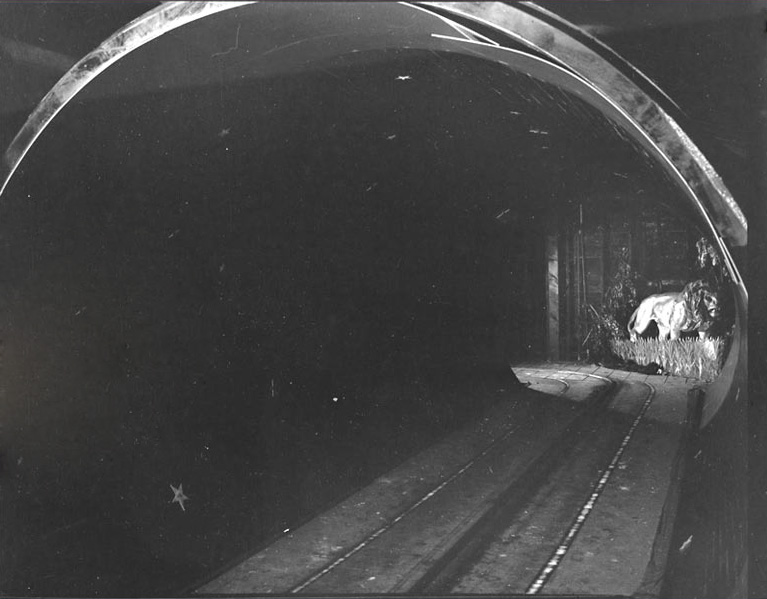
(Somehow my reply got mangled. I attached the reference photo and wrote the following): Thanks again, David (I can't find where to delete duplicate replies to your earlier post). I thought I'd add this source image to the discussion, as it may help to determine the true perspective. |
Posted on 15/03/22 11:20:35 AM |
|
DavidMac
Director of Photoshop Posts: 5672 Reply  |
Re: Tunnel Shape Interior
Oh Tom!! How I wish you had shown us this photograph sooner.   
With any luck it hopefully contains the key to it all. Watch this space .................. _________________ The subtlety and conviction of any Photoshop effect is invariably inversely proportional to the number of knobs on it ....... |
Posted on 15/03/22 12:13:37 PM |
|
DavidMac
Director of Photoshop Posts: 5672 Reply  |
Re: Tunnel Shape Interior
Hi again Tom Your original photo contains the perfect information for determining vanishing points - converging parallels. The tracks and bottom of the curved walls provide exactly this. If you trace these lines to where they intersect you will define the vanishing point. All other parallels, such as the joins between the planking, will radiate from this point. To try and radially distort a photo of planking to fit precisely is possible but not going be easy. I would suggest that you do the best you can with a plain wooden texture without joins which doesn't have to be particularly precise as long as it tapers to the distance. Then draw the joins in black with the line tool on their own layer radiating out from the vanish point. Once drawn use a circular layer mask to hide them where they fall over the rear opening. Double click the layer to open Layer Effects and apply a slight downward Emboss to give the joints a little depth. It's actually a lot easier than it sounds ........ and lots of practice with the line tool! Good luck Tom. I have to confess to being rather pleased to see that my original guesstimate was very close.  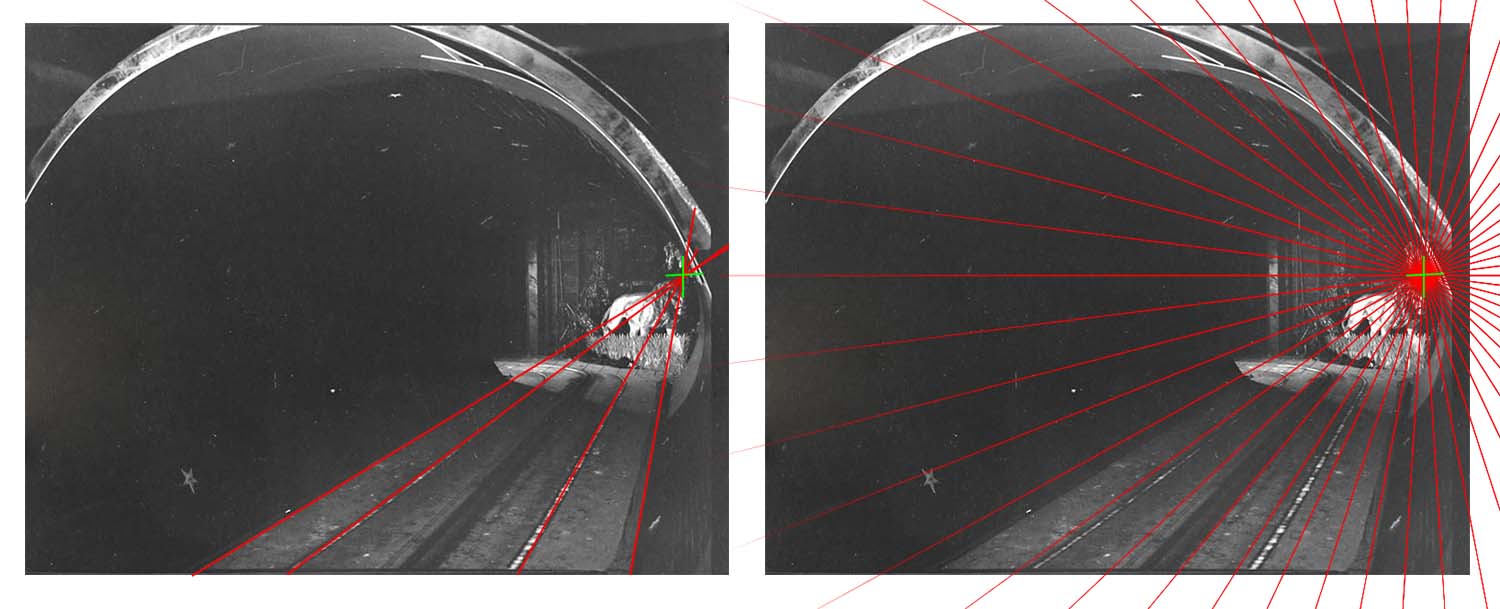 _________________ The subtlety and conviction of any Photoshop effect is invariably inversely proportional to the number of knobs on it ....... |
Posted on 15/03/22 4:46:27 PM |
|
tom8gem@gmail.com
* Posts: 50 Reply |
Re: Tunnel Shape Interior
Thanks so much David, and sorry I didn't post the photo earlier! When I saw what you'd done with perspective lines on my version, it made clear that it was needed; I'd overlooked that. This is great—I'll definitely give this approach a go! I'd used your (wide version) polar coordinates approach, and as you say, it gets very tricky to get this just right via free transform. This alternate approach would seem to offer much more control, drawing in slat lines to exactly the angles they need. Also like you say, probably easier too. So glad this forum is here, I much appreciate your input!  |
Posted on 15/03/22 6:19:54 PM |
|
DavidMac
Director of Photoshop Posts: 5672 Reply  |
Re: Tunnel Shape Interior
It's our pleasure Tom. All of us can remember struggling in the early days. _________________ The subtlety and conviction of any Photoshop effect is invariably inversely proportional to the number of knobs on it ....... |
Posted on 18/03/22 11:00:08 PM |
|
tom8gem@gmail.com
* Posts: 50 Reply |
Re: Tunnel Shape Interior
And here it is w/ corrections for perspective—thanks a heap, David! And Gordon as well, and of course Steve! Hi-res is here, http://thomaskugler.com/img/illustration/darkRides.jpg 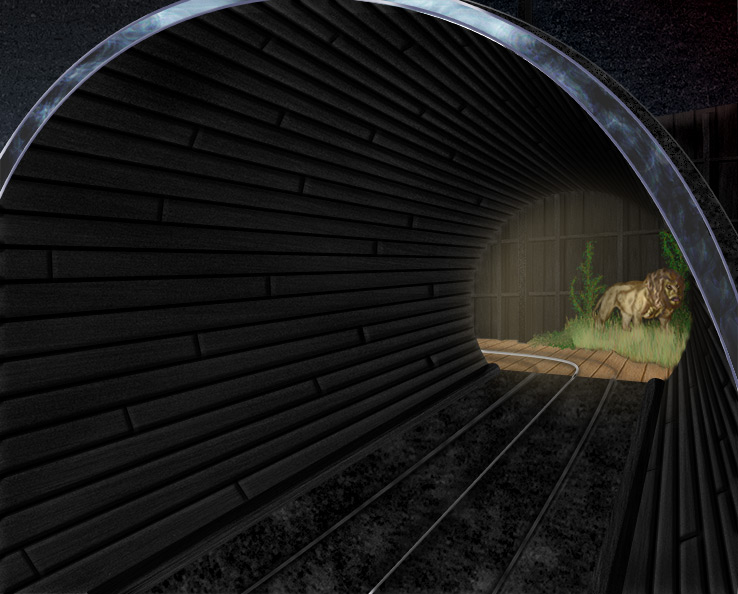 |
Posted on 19/03/22 3:35:55 PM |
|
dwindt
Realism Realiser Posts: 920 Reply |
Re: Tunnel Shape Interior
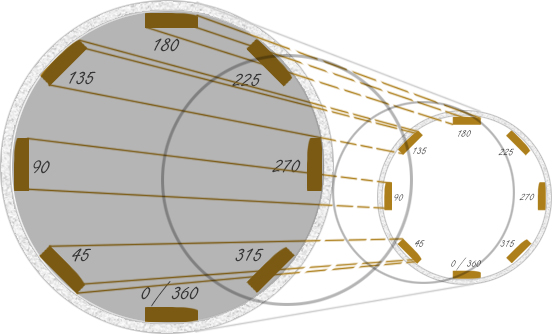
I saw this last night and read through the discussion. Very good advice guys. I have no idea how I would do this with tricks. I'd slog at it the long tedious way. I would most probably create a full circle at both ends of the pipe. Starting at top dead center of the first circle, I would section that circle into equal portions...maybe 10 degrees at a time, until I had marked the whole circumference 36 times. (10 into 360 ) I would replicate that circle on the other side of the pipe and resize it. By joining the corresponding 10 degree marks, I would have the perspective for my planks. Then I'd bend and push and skew and bang and cut, until the chaos represents a receding pipe. n' Boer maak n' plan (a farmer makes a plan) - he uses bailing wire to fix everything that is broken. That's how I use Photoshop...lol...and it works but I'm slow. So my advice to you Tom is, listen to Steve, David, Gordon and the rest because that was sterling advice they've just offered. Oh, by extending the lines when joining the corresponding 10 degree marks would give you an accurate perspective disappearing view point for your pipe and rail. (Could use only 4 corresponding marks at 90 degree increments) but seeing as I needed guide lines for cramming my planks in convincingly... but then again, I would most probably use a 3D program cause in this case, it would be quicker. 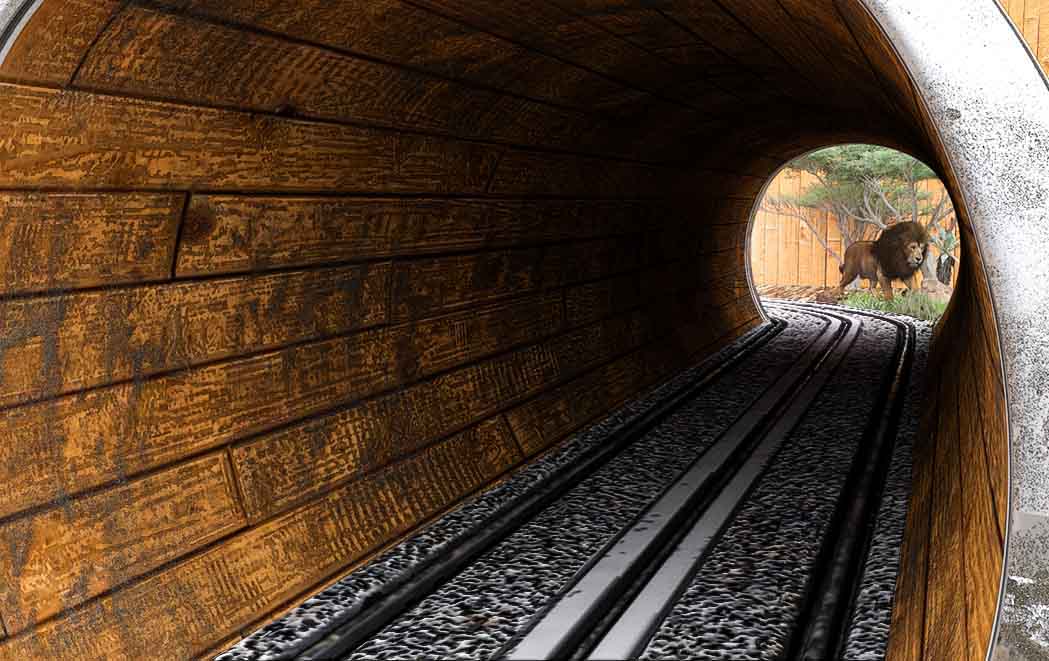
_________________ The grass is greener on the other side of the fence because there is more $hit there. |
Posted on 19/03/22 3:43:02 PM |
|
dwindt
Realism Realiser Posts: 920 Reply |
Re: Tunnel Shape Interior
By the way, I saw your results this morning and couldn't believe I was readying this as an example for you. Very good effort. I'm glad I managed to stay true to your descriptions. Well done. _________________ The grass is greener on the other side of the fence because there is more $hit there. |
Posted on 19/03/22 3:45:00 PM |
|
DavidMac
Director of Photoshop Posts: 5672 Reply  |
Re: Tunnel Shape Interior
Hi Tom. I only just caught your new version. Yes! That works. Excellent. Delighted we have an outcome. _________________ The subtlety and conviction of any Photoshop effect is invariably inversely proportional to the number of knobs on it ....... |
Posted on 19/03/22 4:01:57 PM |
|
dwindt
Realism Realiser Posts: 920 Reply |
Re: Tunnel Shape Interior
Tom, check your joins between the planks. Especially 10 to 12 'o'clock high. The joining lines must follow the contour of the pipe. _________________ The grass is greener on the other side of the fence because there is more $hit there. |
Posted on 19/03/22 7:07:20 PM |
|
tom8gem@gmail.com
* Posts: 50 Reply |
Re: Tunnel Shape Interior
Thanks again, David; your approach worked out wonderfully. Dennis, I've made slight adjustments to the vertical joins I think you mean. I eyeballed those in; I wasn't sure of a scientific way to get them right. I tried to put each at a right angle across the horizontal plank it divides. At first, I put one on each plank, but quickly decided that was too busy and randomized them to a degree. Hopefully, this one works better (I've also updated the hi-res version at the URL above). Thank you for your input. 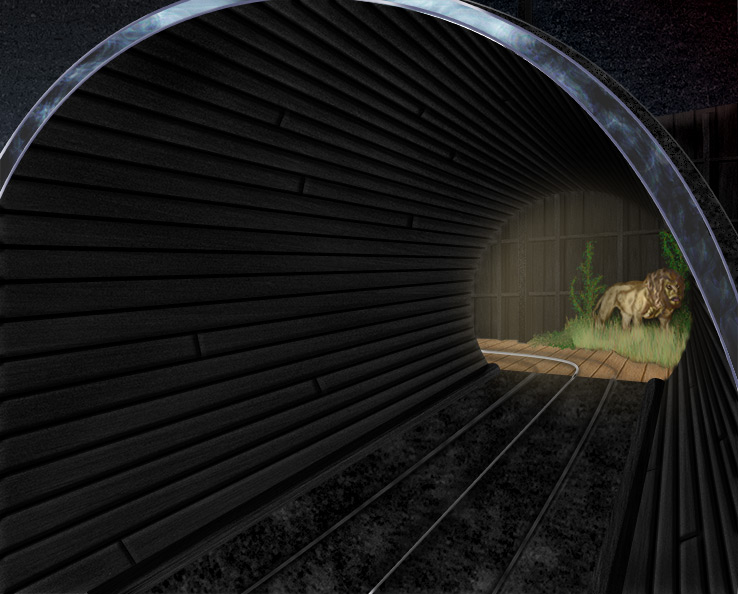 |
Posted on 19/03/22 10:03:12 PM |
|
dwindt
Realism Realiser Posts: 920 Reply |
Re: Tunnel Shape Interior
Your planks are sitting flush with the pipe surface. Every plank's angle adjusts according to the contour of the surface, (the pipe) therefore the join that you can see across the plank, follows the shape of the surface it is attached to. In this case the plank is attached to a pipe, which is circular so the cut /joint should follow a circular pattern around the pipe, at the point that it is cut. I hope that the image helps you more than my stammering...lol. 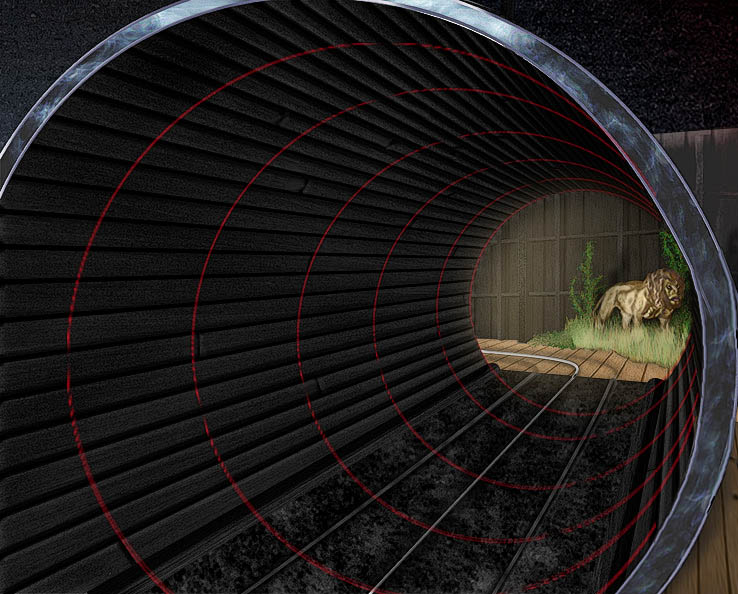 _________________ The grass is greener on the other side of the fence because there is more $hit there. |
Posted on 19/03/22 10:35:11 PM |
|
dwindt
Realism Realiser Posts: 920 Reply |
Re: Tunnel Shape Interior
 _________________ The grass is greener on the other side of the fence because there is more $hit there. |
Posted on 24/03/22 04:04:44 AM |
|
tom8gem@gmail.com
* Posts: 50 Reply |
Re: Tunnel Shape Interior
Thank you Dennis, this is very helpful and great to know! |
Posted on 25/03/22 08:52:27 AM |
|
dwindt
Realism Realiser Posts: 920 Reply |
Re: Tunnel Shape Interior
You're welcome. _________________ The grass is greener on the other side of the fence because there is more $hit there. |
| page: 1 2 3 last |